Category: Latest Trends

Gimkit is an online studying game that turns regular quizzes into entertainment, and interactive challenges. Created by a high school student in 2017, Gimkit lets instructors and students play quiz-style video games on any subject. There is a twist for students who can earn virtual money for correct answers, which they can use to buy advancements and power-ups to reach the next levels in the game.

Whether it is science, history, or math, Gimkit makes learning feel more like playing a game than sitting in class. That is one major reason why it has emerged as a favorite tool in schools.

What is Gimkit used for?

One very often asked question is the use of Gimkit. Here are the things Gimkit specially used to address:

  • Review classes earlier than a check
  • Practice vocabulary
  • Make mastering interactive and aggressive
  • Encourage participation in each in-class and homework settings

How Is Gimkit Used?

Teachers create or select a quiz set (called a “kit”) and launch a game in class. Students enter by using a code on their devices. As they solve questions, they earn in-game money. This money is not real, however, it makes the game interesting by allowing students to “purchase” bonuses like faster earnings or second chances.

Gimkit can also be assigned as homework so students can practice outside the classroom at their own pace.

Why Is Gimkit So Popular?

Here is the reason that makes Gimkit so famous among students and teachers.

  1. It makes studying a pleasure: Instead of simply answering boring questions, students experience it like they are playing a recreation.
  2. It rewards progress: Correct answers suggest extra digital money, which can be used to improve their performance in the game.
  3. It works for any difficulty: From fundamental math to high school science, it fits into every school room.
  4. It gives one-of-a-kind game modes: Gimkit Live, Team Mode, Humans vs. Zombies, and even drawing games to keep the enjoyment clean.
  5. It gives on-the-spot comments: Teachers and students can at once see what regions want more practice.

Teachers find it compelling because students are more targeted and active. Students like it because they are entertaining even when studying.

How Old Is Gimkit?

Gimkit was first launched in 2017 by Josh Feinsilber, who was a high school learner at the time. He wanted to create a better way to look at it and came up with this idea as a school assignment. Today, Gimkit is used in lots of schools around the world and continues to develop with new features and updates.

That means Gimkit is 8 years old as of 2025 and it is nevertheless getting better.

Who Can Use Gimkit? (Is Gimkit 13+?)

Gimkit’s terms of service state that students have to be 13 years or older to create their own accounts. However, instructors can create accounts and invite more students to join games in a supervised classroom setting. So yes, “Gimkit 13+ ” means students under 13 have to use it with help from a trainer.

This age coverage follows well-known online safety guidelines, like COPPA (Children’s Online Privacy Protection Act), to guard younger users.

Can You Earn Money on Gimkit?

One famous and amusing part of the game is earning in-game money. But people once in a while ask: “Can you earn actual money on Gimkit?”

The answer to this is no, you can not earn real money. The cash earned in Gimkit is digital and the most effective work within the game. It only works for strength-ups, improves scores, and stays aggressive in the course of gameplay.

Gimkit Game Modes and Features

Gimkit has several precise game modes that make it more thrilling than traditional quizzes:

Classic Mode – Answer questions separately to earn in-game cash and power-ups.

Team Mode – Work with classmates to compete with different teams.

Humans vs. Zombies – A fun battle-style game that blends gaining learning with method.

Draw That! – Like a Pictionary with an educational twist.

Trust No One (Among Us Style) – Mixes getting to know with mystery and teamwork.

These game modes allow teachers to exchange matters and preserve students’ enthusiasm for learning.

Creating a Kit: How It Works

Creating a quiz (or “kit”) on Gimkit is outstanding simple:

  1. Log in to your teacher account.
  2. Choose from templates or create your own.
  3. Add questions, more than one preference solution, or even snapshots.
  4. Launch the package in live mode or assign it as homework.

You also can import question units from different systems like Quizlet.

Free vs. Pro Version

Gimkit gives an unfastened version with limited features and a Pro subscription with entry to all game modes and superior tools. Many teachers start with the free version and improve if they need to use Gimkit more often.

The Pro version unlocks:

  • Unlimited kits
  • All game modes
  • Class progress reviews
  • Extra customizations

Final Thoughts

Gimkit is changing how classrooms work by means of blending getting to know with gaming. It keeps students engaged, permits teachers to track development, and makes analyzing plenty more fun.

California is the most populous nation in the U.S. and is home to a number of the country’s most interesting and unique cities. Each one has its very own identification; some are well-known for movies, others for generation, farming, or culture.

Let us take a brief look at the ten largest towns in California by means of the population, what makes them special, and what could cause them to be even higher.

1. Los Angeles – 3,820,914

Los Angeles is the biggest town in California and the second-largest in the United States. It is exceptionally acknowledged for being the heart of the entertainment world, with Hollywood and limitless TV and movie studios. It additionally has lovely beaches, fantastic meals, and lots of museums and points of interest.

The factors that still need to be worked on are high traffic and costly housing.

2. San Diego – 1,388,320

San Diego is cherished for its ideal climate, leisurely beaches, and comfortable vibe. It is additionally a key center for biotech research and army defense. Tourists flock here for the well-known San Diego Zoo, parks, and museums. Its location close to Mexico adds a rich cultural taste.

It could be even better if it had more low-priced housing and higher public transit.

3. San Jose – 969,655

San Jose is the heart of Silicon Valley, where many of the global’s top tech agencies are primarily based. It is a high-tech metropolis, but it also has notable museums, theaters, and food. Plus, it is near trekking trails and nature parks.

It could be even better with an affordable cost of living for local workers.

4. San Francisco – 808,988

San Francisco is famous for the Golden Gate Bridge, cable cars, and its scenic hills. It is a busy city full of subculture, art, and finance. Neighborhoods like Chinatown and the Mission District provide it with a unique fondness.

The area of improvement in San Francisco is its housing and homelessness problems.

5. Fresno – 545,716

Fresno is in California’s Central Valley and is one of the country’s top farming towns. It is near Yosemite and Sequoia National Parks, making it ideal for outdoor buffs. Fresno State University adds power to the community.

It could be even better with more job possibilities outside of agriculture.

6. Sacramento – 526,384

As the state capital, Sacramento is where California’s large political decisions are made. It has an affluent record, with sites like Old Sacramento and the Railroad Museum. The town is also recognized for its rivers and bike-pleasant regions.

Sacramento could be even more elevated with the development of arts and traditional spots.

7. Long Beach – 449,468

Long Beach sits on the Southern California coast and has a hectic port, the well-known Queen Mary ship, and a wonderful aquarium. It also has a strong arts scene and a vibrant, diverse community.

The areas of improvement that could make Long Beach better are cleaner air and traffic flow.

8. Oakland – 436,504

Oakland is simply across the bay from San Francisco and has a rich blend of culture, artwork, and records. It is regarded as a work of art, track, and its strong community identification. Parks and waterfronts add to the town’s allure.

Oakland needs increased safety and support for local businesses to improve.

9. Bakersfield – 413,381

Bakersfield is well-known for the “Bakersfield Sound” in country music. It is additionally sturdy in agriculture and power. The metropolis is growing speedily and has a clean approach to country-wide parks and nature trails.

The charm of Bakersfield could be even higher if it had more cultural attractions and nightlife.

10. Anaheim – 340,512

Anaheim is home to Disneyland, one of the most famous theme parks in the world. It is a top tourist destination, and sports lovers experience watching the Anaheim Ducks and Angels.

Anaheim needs to focus more on local community services and less traffic to be a better place.

Final Thoughts

California’s biggest towns show how diverse and interesting the kingdom honestly is. From the bright lights of Los Angeles to the quiet farming areas of Fresno, every city has something different to provide. While all have room to develop, they play a unique position within the Golden State’s tale.

When it comes to personalizing your Glock, one of the tasks you may encounter is removing the back plate. The back plate, or slide cover plate, is a vital factor positioned at the rear of the slide, playing a key position in holding important inner elements like the firing pin spring and spacer sleeve in the area. While it does not affect the firearm’s performance, many gun owners replace it with a custom design to add a non-public touch to their Glock.

Preparing Your Glock for Work

Before you start working on your Glock, protection needs to be the prime priority. Start by confirming that your firearm is completely unloaded. First, clear the mag and set it aside. Then, pull the slide back lower and test the chamber to verify it is empty. Once you have accomplished that, point the firearm in a secure direction and pull the trigger to release any inner tension. This step guarantees the firearm is safe to address in the process of casting off the back plate.

Removing the Glock Back Plate

The method of eliminating the back plate is tremendously simple but requires a little care. Begin by disassembling the slide from the frame. To do this, slightly pull the slide lower back while simultaneously pulling down each side of the slide lock lever. Once you have removed the slide, carefully eliminate it from the body. With the slide in hand, flip it upside down to discover the returned plate that is placed at the rear of the slide.

Now, to safely free the lower back plate, you will need to relieve the tension on the firing pin spring. To do that, press down on the spacer sleeve with the usage of a small punch tool or flathead screwdriver. Keep constant stress on the spacer sleeve while making sure your thumb is over the back plate to save you the inner additives from springing out. Once the tension is relieved, you can effortlessly slide the back plate downward and eliminate it. Set the lower back plate apart for cleansing, alternative, or customization.

Replacing the Back Plate

If you are seeking to replace the back plate of your Glock with a brand new one, the installation manner is just as simple. Start by aligning the new back plate with the grooves on the rear of the slide. Press down on the spacer sleeve back, making sure that the new plate fits securely into place. Slide the back plate upward over the spacer sleeve and extractor spring, and once it is in position, launch the stress on the spacer sleeve. This will permit the back plate to lock into the location. Double-check that the back plate is seated properly and that all internal additives are aligned correctly.

Reassembling Your Glock

Once you have changed the back plate, it is time to reassemble the Glock. Start by reattaching the slide to the body. Align the rails and push the slide forward until it locks into the vicinity. Next, rack the slide sometimes to provide smooth operation. It is additionally a great idea to carry out a characteristic test via dry-firing the firearm (following all protection protocols) to make sure the whole lot is working because it must.

Customizing Your Glock Back Plate

Replacing the back plate additionally offers you the possibility to customize your Glock. Custom lower back plates are to be had in quite a few designs, from simple trademarks to tricky styles or even complete-coloration designs. You can select lower back plates made from specific materials inclusive of aluminum or stainless steel for more advantageous sturdiness. There also are various colors available, allowing you to fit the back plate to the rest of your firearm or other accessories.

Tips and Troubleshooting

While the technique is fairly trustworthy, there are some points to keep in mind. Always be careful while relieving tension on the firing pin spring, as this can save the inner components from springing out all of a sudden. Use the best tools, which include the right size punch tool or flathead screwdriver, to avoid destructing the components. Additionally, make sure that the replacement back plate is compatible with your unique Glock version, as sizes can vary depending on the model.

Final Thoughts

Removing and changing the Glock back plate is a clean and rewarding job that gives each capability and personalization. Whether you are upgrading to a custom back plate or clearly checking your firearm’s internals, following the steps cautiously guarantees a safe and clean procedure. Always prioritize protection, and if you are ever unsure, consult the manual on your specific Glock version. By taking the time to hold and customize your Glock, you will illustrate each its performance and its appearance.

The pike handstand is a tough posture that strengthens your core, shoulders, and improves balance. It calls for perfection in its technique, as even minor errors can wreck your overall performance or lead to injury. In this blog, we will discover common errors in pike handstands and the way to correct them for a more secure, extra effective practice.

Focus on Technique and Form While Performing the Pike Handstand

Proper shape is important in a pike handstand to maintain stability and prevent strain. This pose involves bending the hips to form an upside-down “V” shape, but keeping a strong, aligned body is prime. The following mistakes can throw off your technique:

Common Mistakes Such as Arching the Back or Incorrect Arm Placement

1. Arching the Back

Arching your back compromises the spine’s alignment, leading to lower back strain. It also makes it harder to balance.

How to fix it:

Engage your core and draw your belly button toward your spine. Keep your ribs in and chest open to maintain a straight back.

2. Incorrect Arm Placement

Placing your hands too wide or too narrow can disrupt balance and strain your shoulders.

How to fix it:

Position your hands shoulder-width apart with fingers spread for a stable base. Keep your arms straight but not locked.

3. Looking Down

Looking downward can throw off your balance and misalign your body.

How to fix it:

Focus your gaze on a point in front of your eye level to maintain stability.

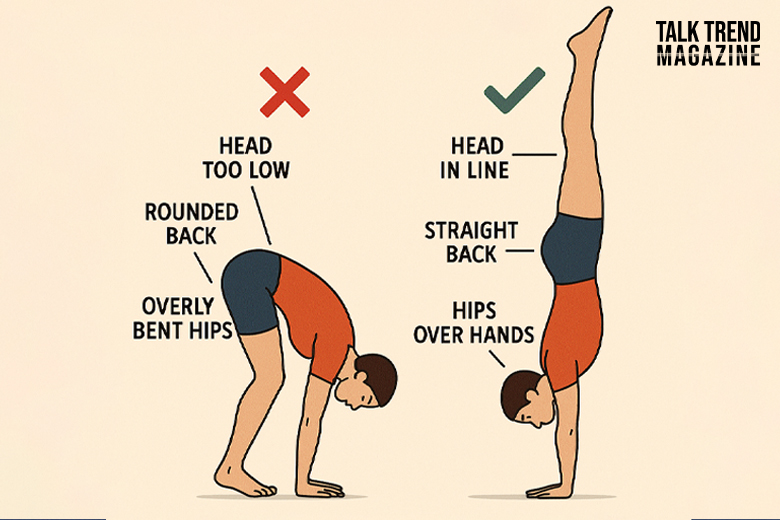
How to Ensure Proper Alignment and Avoid Injury

To find the desired results, make sure to have proper alignment. In severe cases, it may lead to injury. If you focus on the following three parts, you will master it and avoid possible injuries as well.

1. Engage Your Core

A strong core is needed for stability and for the lower back. Engage your abdominal muscles throughout the pose.

2. Align Shoulders and Wrists

Make sure your shoulders are stacked directly over your wrists to prevent shoulder strain and keep your weight properly distributed.

3. Straighten the Legs

Avoid letting your legs droop or bend too often. Keep them straight and engaged for better balance.

Troubleshooting Tips for Beginners Struggling with the Pose

If you are new to the pike handstand, it is normal to face challenges as you learn the balance and technique. Here are some helpful troubleshooting tips for beginners who are struggling:

1. Practice with Wall Support

If you are having a problem balancing, try leaning your back against a wall. This will give you something to lean on and assist your focus on the approach without falling.

Tip:

Start a handstand function along with your toes lightly touching the wall. As you feel more secure, try to reduce the amount of wall help and keep the position for longer periods.

2. Strengthen Your Shoulders and Core

The pike handstand is based closely on shoulder and core strength. If you are not yet strong enough in these areas, the pose could be highly difficult to carry out.

Tip:

Incorporate shoulder-strengthening exercises like downward dog push-ups, shoulder presses, and plank variations into your training routine. Core sporting events like leg raises and boat pose can also help construct the strength needed for the handstand.

3. Use a Spotter

When mastering any inversion, it is usually an excellent idea to have a spotter, especially if you are working towards freestanding pike handstands. A spotter can offer assistance, guide you through changes, and catch you in case you fall.

Tip:

Have a reliable friend or trainer spot you when you are training the pose. They can help make certain you are aligned efficiently and offer guidance as you work on building power and confidence.

4. Do not rush the Process

Mastering the pike handstand takes time and persistence. If you experience that you are suffering, do not get discouraged. The more you practice, the stronger and more confident you will become.

Tip:

Break the pike handstand down into smaller steps. Start with practicing handstands against the wall, then gradually work on bringing your hips higher and aligning your body properly.

Conclusion

The pike handstand is a challenging but rewarding pose. By focusing on proper alignment and technique, you can avoid common mistakes and perform the alignment safely. With consistent practice and attention to form, you will improve your strength, balance, and overall yoga practice.

Eka Pada Tadasana, or One-Legged Mountain Pose, is a powerful yoga pose that strengthens your body, improves balance, and improves focus. Whether you are new to yoga or a skilled practitioner, this pose permits you to build a strong foundation of stability and mindfulness.

In this article, we will discover the advantages of Eka Pada Tadasana, provide you with a step-by-step guide to master the pose and highlight common errors to avoid. So, read more if you are here to master this tadasana.

What Is Eka Pada Tadasana?

Eka Pada Tadasana is a standing stability pose that builds power in the legs and core while improving mental attention. “Eka” means one, “Pada” means foot, and “Tadasana” refers to Mountain Pose, which is understood for its grounding and posture advantages. 

When you add the challenge of balancing on one leg, it takes Tadasana to the next degree using improving your balance, attention, and stability.

Benefits of Eka Pada Tadasana

Before you dive into the step-by-step guide, it is crucial to apprehend the numerous benefits of Eka Pada Tadasana. Here are some of the important benefits:

1. Improves Balance

The number one advantage of Eka Pada Tadasana is its capability to improve balance. By lifting one leg even as keeping a steady stance on the other, your body activates the stabilizing muscle in your legs, hips, and core, leading to greater balance and coordination.

2. Strengthens Core and Legs

This pose demands energy out of your core and standing leg, supporting tone and making both areas stronger. Regular practice can improve the tone and fortify your legs, hips, and abdominal muscles.

3. Promotes Better Posture

Eka Pada Tadasana encourages you to interact with your center and align your backbone, which facilitates attaining a higher posture. It additionally opens the chest and promotes a tall, upright stance, which is essential for a healthy posture all through your everyday existence.

4. Enhances Focus and Mental Clarity

Standing on one leg requires concentration and focus. By working on Eka Pada Tadasana, you train your thoughts to live present, calm, and focused, which can help reduce stress and improve intellectual readability.

5. Stretches Hips and Hamstrings

As you lift and expand the elevated leg, you lightly stretch the hamstrings and hips. This can help enhance flexibility and mobility in the lower part of the body over time.

Step-by-Step Guide to Eka Pada Tadasana

Now that you understand the benefits, let us move to the way to perform Eka Pada Tadasana with the right alignment and method.

Step 1: Start in Tadasana (Mountain Pose)

Begin by standing tall with both feet and your arms on your sides. Ground down through the soles of your toes, engage your legs, and start your core. Keep your spine long, your shoulders comfortable, and your chest open.

Step 2: Shift Your Weight to One Leg

Shift your body weight onto your right foot, make sure your foot is firmly planted on the floor. Spread your feet wide for higher balance. Engage the muscle groups in your standing leg and lift your left foot off the ground.

Step 3: Bring Your Left Knee Up

Bend your left knee and get your left thigh parallel to the floor. Flex your left foot so that your toes point downward. Make certain your standing leg is strong and activated to assist your body’s weight.

Step 4: Extend Your Left Leg

Once you reach the point of stability, begin to slowly expand your left leg in front of you. Keep your leg at a top that feels cushy, preferably consistent with your hip. If you are a beginner, it is ok to keep your leg bent or barely lower than your hip top.

Step 5: Engage Your Core and Reach Your Arms

To preserve stability, engage your center muscle mass and keep your spine aligned. You can both preserve your arms at your sides or reach them directly up towards the ceiling for added challenge.

Step 6: Hold the Pose

Hold the pose for 5–10 breaths, or so long as you feel comfortable. Focus your gaze on a hard and fast point in front of you to help keep your stability. If you begin to wobble, gently get your extended leg down and reset before trying once more.

Step 7: Release and Repeat on the Other Side

Slowly lower your left leg back to the ground, returning to Tadasana. Repeat the steps on the alternative leg, specializing in maintaining balance and alignment.

Common Mistakes to Avoid in Eka Pada Tadasana

While Eka Pada Tadasana is a first-rate pose for building energy and stability, it is vital to practice with consciousness to keep away from unusual errors. Here are some mistakes to observe out for:

1. Leaning to One Side

Many beginners generally tend to lean to 1 side or tilt their hips, which may cause instability and soreness. Keep your pelvis level and your hips squared ahead to make certain right alignment.

2. Hunching the Back

Another unusual mistake is rounding or hunching the back. To keep away from this, interact with your middle and lift your chest. Imagine a string pulling you upward from the crown of your head to lengthen your backbone.

3. Collapsing the Standing Leg

When you stand on one leg, it is clear to crumple your knee inward or let your leg become risky. Make sure your standing leg is powerful, with the knee barely bent but not locked.

4. Holding the Breath

It is vital to hold your breath deeply at some stage in the pose. Holding your breath can boost tension and make balancing tougher. Focus on easy, steady breaths to keep ease and stability.

5. Not Using a Focus Point

Without a fixed point to gaze at, it can be tough to hold stability. Pick a point in front of you (at eye stage) and keep your gaze steady. This will assist you in staying targeted and grounded.

Tips for Improving Your Eka Pada Tadasana

If you are suffering with balancing or retaining the pose, right here are some tips that will help you enhance:

Start with shorter holds: If 5-10 breaths feel too lengthy, start with shorter periods and gradually increase your lasting power.

Use props for help: Practice close to a wall or keep onto a chair or the backside of a sofa for added stability till you feel assured balancing on one leg.

Practice day by day: Like any yoga pose, consistency is prime. The extra you exercise, the greater your balance, power, and focus will improve.

Conclusion

Eka Pada Tadasana is a fantastic pose for strengthening your legs, and core and improving your balance. It also promotes mental readability and awareness, helping you feel grounded and present. By following the step-by-step guide, preventing common mistakes, and incorporating improvement tips, you could grasp this pose to experience its vast benefits.

Remember, yoga is about development, not perfection. Take some time, stay patient, and enjoy the adventure of gaining knowledge of Eka Pada Tadasana!

When winter arrives, many people think about the freezing system of water, specifically when in larger quantities like a gallon. Whether you are looking to freeze water for ice cubes, storing water for outdoor activities, or experimenting with freezing times, you might wonder how long it takes a gallon of water to freeze.

In this blog, we will solve this query and discover the factors that have an effect on freezing times.

Understanding Freezing Basics

Before diving into the specifics of freezing a gallon of water, it is beneficial to know how the freezing process works. Water freezes at 32°F (0°C), and while it reaches this temperature, the molecules slow down and form a strong shape. This process turns the liquid into ice.

However, the time it takes for water to freeze can vary depending on numerous key factors.

How Long Does It Take for a Gallon of Water to Freeze?

A gallon of water normally takes around 3 to 4 hours to freeze completely while located in a widespread freezer. However, that is only a well-known estimate. Several elements can affect the freezing time, and we will explore those to give you a clearer concept of what affects the technique.

Factors That Affect Freezing Time

1. Freezer Temperature

The most significant factor that affects the freezing time is the temperature of your freezer. Most household freezers perform at around 0°F (-18°C). However, if the temperature is better than this, it will take longer for the water to freeze. If you lower the temperature of your freezer to a less warm place, the water will freeze faster. Therefore, the colder the freezer, the faster the freezing system.

2. Container Shape and Size

The form and size of the container retaining the water additionally perform an essential role in how long it takes to freeze. A gallon of water in an extensive, shallow field will freeze quicker than water in a tall, slender field. This is because more floor space of the water is exposed to the cold air, permitting the freezing manner to occur greater fast. On the other hand, a taller field will take longer because much less floor space is uncovered, and the chilled air has to reach the middle of the water to freeze it completely.

3. Water Temperature

If the water is at room temperature (around 68–72°F or 20–22°C), it will take longer to freeze than water that has already been cooled. If you start with cooled water, the freezing can start much quicker. Using pre-chilled water can assist in reducing freezing time by half an hour. On the other hand, hot water can take even longer to freeze than cold water, especially if it is positioned in a fashionable freezer.

4. Airflow Inside The Freezer

A good air stream within the freezer can accelerate the freezing technique. If your freezer is packed tightly with other objects, air may not flow in successfully, which leads to slower freezing times. To freeze a gallon of water faster, try to leave enough space around the box in order that cold air can flow freely.

5. Freezer’s Efficiency

The efficiency of your freezer is another thing to keep in mind. Old fashions or ones that are not energy efficient may fail to hold a consistently low temperature, thus increasing freezing times. Modern, electricity-efficient freezers are designed to keep a strong temperature, supporting your gallon of water freeze extra fast.

Tips for Freezing Water Faster

If you need to freeze a gallon of water in a rush, here are a few recommendations that can help you speed up the system:

Use a shallow box: As described before, a shallow box allows a greater surface region of the water to be uncovered to the cold air, which speeds up freezing.

Pre-chill the water: Cold water freezes quicker than room temperature water, so do not forget to chill the water within the refrigerator for a while earlier than setting it in the freezer.

Lower the freezer temperature: If your freezer has a setting for colder temperatures, decrease it for quicker freezing. Just understand power consumption.

Create greater airflow: Make sure your freezer is not always overcrowded, as precise airflow is important for quicker freezing.

Use ice cube trays: If you only need smaller portions, freezing water in ice cube trays can freeze a good deal faster because of the small amount of water and the multiplied surface region.

What to Do If You Need Ice Quickly?

If you need ice fast but you do not have the time to wait for a gallon of water to freeze, you can count on these options:

Crush ice: Pre-crushed ice available in most grocery shops, or you could crush ice in your freezer to speed up the technique.

Freeze smaller amounts: Instead of freezing a gallon, break the water into smaller portions (like in ice cube trays) to speed up freezing time.

Use a specialised ice maker: If you want ice often, making an investment in a committed ice maker might be a solution, as these machines freeze ice quickly.

The Role of Water Quality in Freezing

You might not realize it, however the quality of water also performs a role in how fast it freezes. Water with more impurities, which include minerals and chemical compounds, may additionally increase the freezing time due to the fact these residues can intrude with the freezing method.

On the other hand, purified or distilled water tends to freeze faster and regularly forms clearer, more uniform ice cubes.

Common Freezing Problems

While freezing a gallon of water is usually straightforward, there are a few common troubles that humans face:

Uneven Freezing: If the water does not freeze uniformly, it can be due to the fact the freezer is not keeping a regular temperature, or the container shape is causing an uneven exposure to cold air.

Cracked Containers: If you freeze a gallon of water in a glass container, there is a hazard of it cracking. Water expands while it freezes, so it is better to apply plastic or other flexible packing containers for big quantities.

Ice Formation at Different Speeds: If you are freezing water in a container with various thickness, the outer layers of water might freeze first, leaving the center still liquid. This is why shallow containers work better for faster freezing.

Conclusion

Generally, it takes around 3 to 4 hours for a gallon of water to freeze in a trendy freezer. However, this time can be prompted with the aid of factors which include the freezer temperature, box form, and water temperature. By learning those variables, you can freeze your water greater effectively and even speed up the procedure when essential. Whether you are aiming to freeze a gallon for an assignment, for outside activities, or simply to have a massive block of ice reachable, being knowledgeable to those freezing elements will help you control the procedure correctly.

Detroit, a city in Michigan with a decadent history and a vibrant lifestyle, has faced notable economic challenges over the decades. While parts of the city have experienced revitalization, many areas nevertheless battle with excessive crime quotes, financial hardship, and urban decay.

In this article, we will discover what is regularly taken into consideration the worst part of Detroit, and why these neighborhoods face such problems.

What Defines the Worst Part of Detroit?

Before we dive into precise neighborhoods, it is critical to apprehend what makes a place one of the worst parts of Detroit. Typically, these regions suffer from excessive crime rates, poverty, unemployment, and the conflict for basic services. The neighborhoods frequently see a loss of funding from each of the authorities and private entities, making it hard for them to thrive. Let us check a number of the neighborhoods considered the worst parts of Detroit.

1. Belmont: A High-Crime Zone

Belmont is regularly noted as one of the worst components of Detroit due to its alarmingly high crime rates. With incidents of violent crime, which include robbery, sexual assaults, and gang activities, this region has become a hotspot for criminal conduct. 

Residents of Belmont face everyday challenges with protection, and the median domestic charge is $29,300. This paints an image of the area’s economic scenario. The community suffers from a loss of funding, making it tough for plenty of households to break free from the cycle of poverty and crime.

2. Petosky-Otsego: Poverty and Crime Overwhelm

Petosky-Otsego, another area frequently defined as one of the worst parts of Detroit, with alarming crime rates, and its citizens experience massive economic hardships. With a crime rate much worse than the state and national average, this community struggles with gang robberies and dangerous situations. 

The median home rate here is the lowest in Detroit, further emphasizing the economically demanding situations that citizens face. Efforts to improve protection and monetary conditions have been ongoing, but the area nevertheless remains one of the metropolis’s hardest locations to live.

3. Brightmoor: Struggling to Rebuild

Brightmoor is a neighborhood that is often discussed when anyone asks about the worst elements of Detroit. Once a thriving operating-class area, Brightmoor now faces extreme city decay, with abandoned homes and organizations scattered throughout the streets. 

Despite these challenges, the community is actively operating to rebuild via efforts like urban farming and blight elimination. Still, the community struggles with crime and a loss of process opportunities, making it one of the top challenging locations to live in Detroit.

4. Osborn: A Declining Area with No Relief

Osborn, positioned in the northeast phase of Detroit. It has seen better days. The region, with its excessive crime rate and several abandoned homes, is frequently mentioned as one of the worst components of Detroit. 

Once a bustling community, Osborn now faces the consequences of financial decline and population loss. The combination of gang violence, poverty, and a loss of infrastructure has made it a difficult area to live in, with little on-the-spot comfort in sight for its residents.

5. Boynton–Oakwood Heights: Environmental and Health Hazards

Boynton–Oakwood Heights, often considered one of the worst parts of Detroit, is not only economically distressed but also grapples with extensive environmental issues. Located in a heavily industrialized area, this neighborhood is one of the highest polluted areas of Detroit. 

Residents face higher charges of asthma, cancer, and other fitness issues because of the encircling environmental dangers. The combination of terrible fitness and economic challenges makes this area one of the most difficult places to live in the town.

6. Conant Gardens: Once Affluent, Now Struggling

Conant Gardens was once home to Detroit’s most prosperous Black communities, but through the years it has become one of the worst parts of Detroit. Today, almost half of the citizens stay below the poverty line, and the neighborhood faces high unemployment charges. 

The once-thriving community now battles crime, blight, and the absence of resources vital to oppose its decline.

7. Chaldean Town: Cultural Heritage Amid Economic Hardship

Chaldean Town was once home to Detroit’s Chaldean Christian people and is understood for its cultural richness. However, despite this vibrant history, the community suffers from high unemployment and financial instability, making it one of the worst components of Detroit. 

The median earnings are low, and the vicinity struggles with the same issues of crime and poverty that haunt different components of the city.

8. Forest Park: Small Community, Big Challenges

Forest Park, with a population of just over 1000, faces widespread economic problems. The region has a high unemployment rate, with many residents living nicely beneath the poverty line. With crime on the rise and little funding entering the area, it is no surprise that Forest Park is taken into consideration as one of the worst parts of Detroit.

9. Poletown East: A Neighborhood in Economic Decline

Once a thriving network of Polish immigrants, Poletown East has faced massive demanding situations in recent years. Today, the community is considered one of the worst components of Detroit due to its monetary decline, high unemployment, and rising crime quotes. The community struggles with a lack of funding and is in desperate need of revitalization.

10. Von Steuben: High Crime and Economic Struggles

Von Steuben, like many different neighborhoods in Detroit, is plagued by high crime costs and financial hassle. It is frequently indexed as a number of the worst parts of Detroit because of its ongoing struggles with safety and poverty. Residents face demanding situations finding work and simple offerings, and crime remains a regular hazard within the place.

Conclusion

While the areas we have mentioned are often taken into consideration as the worst parts of Detroit, they are not without desire. Community leaders, residents, and corporations keep on working toward restoring these neighborhoods. Although the demanding situations are worse, the resilience of Detroit’s humans gives a glimmer of hope. With the right aid, investment, and interest, those neighborhoods can one day triumph over their struggles and rise once again.

Joe Rogan is a well-known podcaster, comedian, and UFC commentator. In 2020, Joe Rogan made waves by moving from California to Texas. He bought a lovely $14.4 million property on the shores of Lake Austin, signaling a main lifestyle shift. The choice was partly pushed with the aid of his complaint about California’s high taxes and strict COVID-19 policies, which he voiced on his podcast.

A Fresh Start in Austin

Before moving to Austin, Rogan lived in Bell Canyon, California, together with his wife, Jessica Ditzel, and their 3 kids. He found out his will to relocate in an episode of The Joe Rogan Experience, expressing his desire for a trade of scenery. The town is full of life and plenty of relaxed policies made Austin an attractive choice for Rogan, which in the long run led him to buy his dream house.

Exquisite Architecture and Design

Rogan’s Texas mansion, first constructed in 2006 and considerably remodeled earlier than his purchase, spans an outstanding 10,980 square feet. Located in the prestigious Spanish Oaks community, it gives lovely views of the Texas Hill Country. Designed by way of renowned architect Marcio Kogan and built by Shoberg Homes, the estate sits on 7.2 acres of land, providing both privacy and masses of space.

Unmatched Luxury Amenities

This expensive mansion is filled with top-tier features, consisting of:

Bedrooms and Bathrooms: The home boasts eight spacious bedrooms and ten toilets, providing comfort and privacy for every family and visitor.

Outdoor Living: The mansion includes a saltwater pool, a couple of terraces, and three docks that offer direct access to Lake Austin, best for boating or simply relaxing.

Fitness and Wellness: Rogan’s commitment to health and fitness is catered to with a fully equipped gym, sauna, and a cold plunge tub.

Entertainment Spaces: The mansion is designed to deal with his lifestyle with a bar, a wine cellar, and a four-car garage.

The Podcast Studio

A key highlight of Rogan’s mansion is the custom-built podcast studio, in which he recorded episodes of The Joe Rogan Experience. This dedicated space now not only guarantees awesome production but also draws a wide range of outstanding guests, making it the heart of Rogan’s professional work.

Privacy and Seclusion

Rogan’s mansion is tucked away on a personal road, presenting a peaceful retreat far from the noise of city life. He has usually emphasized the importance of privacy and the home’s design displays that, imparting a secure and serene environment.

A Creative and Relaxing Retreat

Beyond its lavish benefits, Rogan’s Austin mansion serves as a sanctuary for both work and rest. The tranquil surroundings and thoughtfully designed spaces provide the appropriate setting for creativity, making it an ideal home for both family lifestyles and professional endeavors.

Conclusion

Joe Rogan’s $14.4 million mansion in Austin represents the precise stability of luxury, privateness, and capability. This estate now not only effectively meets the needs of his family but also helps his work, inclusive of his successful podcast. The flow marks a new mark in Rogan’s life, reflecting his private values and preferences for a nonviolent, productive lifestyle.