
In today’s busy and fast-changing global enterprise, businesses deal with all types of challenges. From maintaining their groups on the same page to quickly adjusting to new technology, there is a lot to control. That is where Consultant WIUFAMCTA JIVBCQU comes in.
It is a brand new sort of consulting approach that helps corporations grow the use of smart planning, teamwork, and clear outcomes.
Understanding WIUFAMCTA JIVBCQU
Although the name WIUFAMCTA JIVBCQU might sound complex, the idea behind it is straightforward. It is a smart and well-designed way for specialists to assist businesses in resolving problems and reaching their goals. This method focuses on facts, teamwork, and practical movement, from placing goals to truly making them show up.
Unlike old consulting styles that relied mostly on theories and “cookie-cutter” plans, this approach mixes professional knowledge with teamwork and flexibility. That makes it a better fit for the way present-day businesses want to work these days.
The Core Principles Explained Simply
WIUFAMCTA JIVBCQU is built on some fundamental thoughts that make the process work well. Here is what they suggest in regular phrases:
Get the Team Involved: Everyone needs to have a voice, from ideal managers to junior team members.
Think Creatively: New thoughts assist businesses in staying ahead of the competition.
Use Resources Wisely: Make the most of your time, money, and people.
Check In Often: Regular comments help you improve and address issues early.
Be Flexible: Be equipped to exchange routes if needed.
Measure Progress: Use numbers to see what is working and what is no longer.
Work Together: When groups from distinct areas collaborate, solutions get better.
Use Smart Tools: Technology can make matters quicker and simpler.
Stay Accountable: Everyone has to recognize their role and take responsibility.
These thoughts create a helpful cycle: plan, act, evaluate, and improve. It keeps agencies going ahead consistently and cleverly.
Why Are More People Using This Approach?
WIUFAMCTA JIVBCQU is not just a contemporary name. It is creating an actual distinction for lots of companies. It helps bridge the space between planning and real action by providing techniques that are not only theoretical but also work on the floor.
One of its key strengths is the way it includes employees in the process, growing a sense of ownership and agreement that results in better results. This method also emphasizes the use of records and non-stop comments, permitting businesses to track development and make clever, timely decisions.
Consultants who apply the WIUFAMCTA JIVBCQU approach generally come from various fields like psychology, data evaluation, and digital technology. This various heritage gives them a broader angle and permits them to work more like collaborative team members in place of outdoor specialists, bringing more value to every task.
Real-World Impact: Quick Examples
Example 1: A Tech Company
A mid-sized software business was suffering from slow product development and an unmotivated group of workers. By using the WIUFAMCTA JIVBCQU method, especially teamwork and accountability, they have been able to speed up projects and improve employee morale.
Example 2: A Manufacturing Business
A factory wanted to address problems with high-quality and wasted materials. With this approach, they began taking reviews to measure their development, which helped them keep cash and make improved products.
How Can You Use It in Your Business?
Interested in trying this out for your very own business? Here is an easy way to get started:
Listen First
- Talk to your team and find out what is not working.
- Host group sessions to agree on goals.
Set Clear Goals
- Choose targets like making a manner faster or improving client satisfaction.
Get Everyone Onboard
- Involve people from different departments to help create solutions.
Test Small First
- Try a pilot software in one area earlier than rolling it out everywhere.
Keep Improving
- Use regular updates and comments to refine your approach.
Grow Gradually
- Once you notice success, amplify it little by little.
Stay Flexible and Focused
- Adjust your plans based on outcomes and keep using statistics to guide decisions.
Finding the Right Consultant
Suppose you are considering hiring a consultant WIUFAMCTAJIVBCQU. In that case, it is essential to find a person who has deeper experience using this technique and who can share real examples in their work.
An expert consultant should be capable of giving an explanation for the system clearly, providing that everyone in the group is familiar with what is going on and why. They should also realize how to use each remark and measure data to track development correctly.
In addition, strong abilities in present-day digital tools and change management are essential, as those experts frequently work to guide companies through transitions and enhancements in an easy, straightforward manner.
Ask them questions like:
- Can you share a time you helped a business using this method?
- How will you track our development?
- How do you include employees in the process?
Common Mistakes to Avoid
Even with a great system like WIUFAMCTA JIVBCQU, challenges can still arise if not dealt with care. One common mistake is not always listening to your team. When people feel left out, they will resist the changes, no matter how helpful they are. Another problem is a loss of follow-through; without commitment and consistency, even first-class plans can not work.
Overcomplicating the process is likewise a risk. Maintaining things simple allows for maintaining focus and ensures the system stays practical and effective. The best way to avoid those pitfalls is to keep the conversation open, frequently check in on development, and make sure everyone stays involved and informed throughout the experience.
Final Thoughts
Consultant WIUFAMCTA JIVBCQU offers a clean and realistic way for businesses to develop and improve. It is about involving your crew, the usage of facts, staying flexible, and maintaining human responsibility. It gives you a confirmed plan to solve troubles and continue improving over time.
If your company is looking for actual, measurable exchange, this method may be just what you want. Talk to a representative who knows the WIUFAMCTA JIVBCQU system—they could help your business reach ways you did not assume.

Affiliate marketing is one of the simplest and most cost-effective methods to make money online. It does not require you to make investments or spend a penny in advance, create your very own products, or maintain stock. All you need is a smartphone or laptop and an internet connection.
It offers flexible opportunities for students, a parent who has to stay home, or simply a person looking for a side job to meet needs, by selling different people’s products.
In this blog, you will discover a clear and realistic guide that indicates precisely a way to start affiliate marketing, even if you have zero budget.
What is Affiliate Marketing?
Affiliate marketing is a business model where you sell different companies’ products or services. Every time anyone clicks on your unique link, which is known as an associate link, and buys using it, you will earn a commission. You do not want to fear shipping, customer support, or product introduction. Your best activity is to get traffic to click your link and purchase.
For example, in case you sign up for the Amazon Associates Program and share a link to a smartphone charger, you will receive a commission, a percentage of the sale, every time a person purchases it through your link. This version is broadly used by bloggers, YouTubers, influencers, and content creators.
Many famous brands, together with Amazon, Shopify, and Canva, offer associate programs for people to enroll in and earn from.
Step 1: Pick a Niche That Matches Your Interest
Before you start, it is essential to pick out a niche, a specific topic or area that you enjoy and might speak about frequently. This makes it less difficult to create useful content and connect to an audience. An area of interest may be something from fitness, style, era, parenting, schooling, or meals and travel. For example, in case you are passionate about fitness and well-being, you may choose to promote workout tools, healthy snacks, or dietary supplements.
Choosing a niche enables you to build a clear identity and gain loyalty. People are more likely to comply with and purchase from someone seen as knowledgeable in a particular field. So, instead of seeking to sell everything to anybody, focus on one subject that feels natural and exciting to you. If your interests include teaching or sharing expertise, you may also explore how to create and sell an online course for another passive income stream.
Step 2: Choose the Right Affiliate Programs
As soon as you are done while deciding what niche you want to work on, the following step is to find affiliate programs supporting it. There are many free affiliate applications online, and you also do not need to pay anything to sign up for one. Look for packages that offer excellent commissions, have a reliable reputation, and offer high-quality products. Amazon affiliates is a first-rate area to start for novices because it covers nearly every product category and is easy to use.
Other famous affiliate platforms include ShareASale, ClickBank, CJ Affiliate, and Impact.com. These platforms will let you browse and apply for more than one affiliate program in one place. For instance, if you are in the tech niche, you may use CJ Affiliate to promote gadgets from brands like Lenovo or Samsung. If you are in the training space, Impact.com gives partnerships with systems like Canva or Coursera.
Make sure to carefully examine the rules of every application, especially regarding the way you are allowed to sell products. Some may not allow posting links immediately on certain platforms, while others might require an internet site or blog.
Step 3: Build a Free Platform to Share Your Links
You do not need a website or money to start sharing affiliate links. You can use free systems that permit you to create content and reach humans. Social media platforms like Instagram, TikTok, Facebook, and YouTube are extremely good for novices. For example, you could post a short video on TikTok to promote your brand reviewing a product and upload your affiliate link within the bio. Or, you could make a YouTube video explaining a way to use a tool and include your link in the video description.
If you prefer writing, websites like Medium.com and Blogger.com assist you in submitting blog posts without needing your personal domain or website hosting. You can write beneficial publications, product comparisons, or listicles like “Top 5 Budget Headphones,” and encompass your affiliate links inside the article.
Another great option is to begin gathering emails using free tools like Mailchimp. You can send helpful product information directly to your target market via email, though this strategy usually works nicely after you have built some followers.
Step 4: Create Valuable Content Around the Products
To reach affiliate marketing, do not just throw links everywhere, focus on developing value. This method involves writing useful blog posts, filming honest reviews, or recording tutorials that display how a product works. People are more likely to click your hyperlink and buy if they believe your opinion and notice actual value in what you share.
For instance, if you are selling a skin care product, you can make a video explaining your daily skin care routine and displaying how the product fits into it. You may also write a blog post reviewing it after using it for 30 days and share actual results. This sort of content helps build credibility and make your recommendations seem genuine.
Pat Flynn, founder of Smart Passive Income, constructed his entire brand on showing useful, honest reviews and tutorials. He started by writing about tools he used himself and slowly constructed a following. Today, he earns heaps of dollars every month from affiliate links, all because he focused on assisting people first.
Step 5: Get Free Traffic to Your Links
To earn commissions, people need to see and click on your links. That is why learning a way to get free visitors is vital. Search Engine Optimization (search engine marketing) is a free way to rank your blog posts or YouTube videos better in search results, so more people find them. This involves the use of the right keywords for your titles and outlines, including tags, and writing content material that solves common questions.
You can also be a part of Facebook groups related to your niche and become active by answering questions or sharing useful content material (without spamming). Platforms like Quora and Reddit permit you to offer useful answers and mention relevant tools or products along with your affiliated links, when it fits clearly.
Pinterest is another free traffic source. By developing appealing pins that link back to your blog post or product page, you can get constant site visitors over the years. Michelle Schroeder-Gardner from Making Sense of Cents grew her blog visitors, especially through Pinterest, and now earns over $50,000 consistently each month through affiliate advertising.
Step 6: Track Your Progress and Improve
As you start sharing your links and creating content, it is crucial to track what is working. Most affiliate packages provide dashboards showing how many people clicked your link and how many sales you made. You can also use free tools like Google Analytics to reveal how traffic is finding and interacting with your blog or landing pages.
Tracking your development enables you to understand what kind of content material brings the most clicks or sales. If a positive video or blog post is working properly, you could create more content like that. If something is not working, you could try new thoughts or tweak your message. Regularly reviewing your performance is fundamental to long-term growth.
Step 7: Stay Consistent and Keep Learning
Affiliate marketing takes time. You might not make your first sale in the first week or even the primary month. But consistency can pay off. Keep creating beneficial content, checking out new ideas, and getting to know from others who are already a hit in this area. You can also expand your skillset even further, with learning about how to start a drop service business as another online opportunity.
One powerful example is Adam Enfroy, who started affiliate marketing in 2019 and documented everything on his blog AdamEnfroy.com. By publishing valuable content and optimizing it for search engines, he went from $0 to over $100,000/month within two years, all without spending money in the beginning. His story showcases that success is viable with patience, effort, and strategy.
Conclusion
You do not need a massive budget or any finances at all to begin affiliate marketing. By choosing a niche you love, becoming a member of reliable affiliate packages, and constructing free systems that specialize in helpful content, you could begin earning online.
Add in free traffic strategies and constant efforts, and you are on your way to constructing a real earnings flow. The tools are free, the system is straightforward, and the possibilities are real. All it takes is your time, creativity, and the selection to start.

Creating an online course is one of the most effective ways to turn your knowledge into a steady stream of income. Whether you are a trainer, designer, marketer, or truly passionate about your subject, teaching what you know can open doorways to an international audience.
This guide will walk you through the complete procedure, from idea to income, using smooth steps and verified tools.
1. Find a Profitable Topic You Love
The first step is deciding on a subject that you have expertise in and are excited to train in. At the same time, it needs to be something people are actively searching for and are inclined to pay to learn, for which you can take help from market demand.
Ask yourself: what questions do people mostly ask you? What do you understand properly that others would not? A brief study of platforms like Udemy, Skillshare, or maybe Reddit permits you to spot what is trending.
Your topic has to sit at the intersection of your skills and your target audience’s needs. For example, if you are a content creator, you might create a course on “Freelance Writing for Beginners.”
Similarly, if you are a baker, a course like “Cake Decorating Made Easy” may resonate with home baking fans. A course is more likely to sell if it solves a problem or allows a person to achieve a goal.
2. Outline What You Will Teach
Once you have determined your topic, it is time to break it down into an established plan. Think of your course as a step-by-step journey. Where does the student begin? What will they be able to do or recognize by the end? An incredible path leads the learner via small wins that build closer to a bigger result.
Begin by outlining your content into modules or lessons. Each one should recognize a single subject matter and include actionable steps. For example, a course on social media marketing might start with the fundamentals of platform choice, then move into content creation for Instagram Reels, scheduling, engagement strategies, and analytics. A clear outline not only helps your students but also makes content creation a good deal easier for you.
3. Record and Package Your Content
Now it is time to convey your course to life. You do not need high-priced tools to get started; most smartphones have high-quality cameras, and basic tools like a ring light and lapel mic will help improve your video quality. Keep every video brief, preferably between 5 to 15 minutes, to make them extra digestible.
Use screen recording tools like Loom or OBS Studio to create a how-to video. Canva is a wonderful design tool for beginners, and Audacity is an easy tool for editing audio. Alongside videos, do not forget to include downloadable PDFs, templates, or quizzes. If you want to create and sell your own digital downloads, check out this guide to digital planners for Etsy. These extras are not the most effective add-ons, but they also keep students engaged and inspired.
4. Set Up Your Course Online
To sell your course, you will need to host it somewhere. One of the easiest and most flexible alternatives is Shopify. You can turn your Shopify store into a complete-featured learning platform by using apps like Tevello or Courses Plus. These tools let you upload course videos, control student access, or even automate email follow-ups. If you are interested in other ways to build an online business with minimal overhead, you might want to explore how to start a drop servicing business.
On your Shopify dashboard, create a new product and mark it as a virtual object. Upload your materials, write a clear and compelling course description, set your prices, and add a cover image. Be certain to use relevant keywords throughout your product page. This will help potential customers find you via Google and Shopify’s built-in search.
5. Price Your Course Smartly
Pricing is where many new creators get caught. A good plan is to launch with a “beta rate”, something reasonable like $29 to $99. This encourages early sign-ups and gives you the opportunity to receive valuable feedback. Once your course is tested and refined, you could increase the price to reflect its full cost, generally between $199 and $499, depending on the content material and audience.
You can also provide tiered pricing options. For example, a primary model may include videos only, while a premium model includes coaching calls or bonus materials. Offering bundles or club memberships, where students get a collection of guides or ongoing updates, can also boost your income and customer loyalty.
6. Launch and Market Your Course
Now that the whole lot is set up, it is time to let the world recognise. Begin by sharing your course with people who already identify with you. This could be your email subscribers, social media followers, or participants in your community. Create beneficial blog posts, Instagram reels, or brief YouTube videos related to your path content to generate interest.
If you have got the price range, share these commercials on platforms like Facebook, Instagram, or YouTube. You may host a free webinar, questions and answers, or a live class to demonstrate your teaching style and build trust with potential buyers. Do not forget to create a well-designed landing page that clearly explains what is included in the course, what it is for, and what results the student can expect.
7. Support your students
A great course is not just about materials – it is about connection. Support your students even after they have enrolled. You can do it by sending a welcome email, checking for some lessons, or answering questions in a private Facebook group or community center.
Helping your students to succeed not only creates loyalty, but also improves the opportunities that they leave shiny reviews, refer to others or buy your next course. Consider celebrating their progress by sharing a bonus tip, sharing success stories (with their permission) or helping them.
8. Collect the response and continue to correct
After completing the course of your students’ first round, you can ask for feedback. Find out what they loved, what was not clear, and what could be improved. This review is gold. It helps you improve your course and shows students that you care about their experience.
Use testimonials and positive reviews on your sales page to create trustworthiness. As your business grows, you can add new lessons, start advanced courses, or convert your content to a subscription page that brings in recurring revenue. You can also upsell coaching services, templates, or exclusive group access for students who want more support.
Final thoughts
Creating and selling online courses can seem like a big task, but it is completely remarkable as a business. If you are ready to start a small business from home, you only need a clear plan, a topic that you are passionate about, and the right tool. The platforms like Shopify, along with apps like Tevello, make it easy to deliver professional learning experiences with minimal tech stress.
To recap: Start with a course topic that people care about, outline your lessons, record and organize the content, host your courses on a reliable platform, price it properly, bring it to the market effectively, support it in the market, support your students, and do better over time.
Focusing on material and helping others, your online course can become more than one product. This can be a meaningful way to generate revenue, improve your life, and develop your personal brand on LinkedIn.
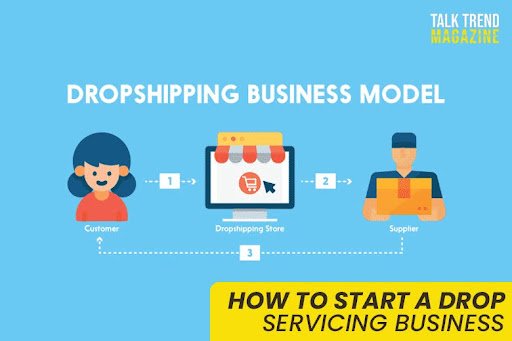
In the past few years, online offerings have grown rapidly, particularly after the COVID-19 pandemic, especially in developing countries. Many people have started working from home, and organizations have started hiring freelancers and agencies for virtual responsibilities like content writing, website development, social media management, and graphic design. This shift made online offerings more popular than ever before. With that upward thrust, new business models appeared, and one of the simplest and smartest is drop servicing.
Drop servicing is a type of business where you sell a service to a purchaser, but outsource the work to someone else. You act just like the center individual. For example, you might provide logo layout services on your website, but when a client places an order, you hire a freelancer to do the task at a lower price. You keep the earnings between what the customer can pay and what you pay the freelancer.
In this blog, you will get step-by-step instructions on how to start a drop servicing business from scratch. We will cover everything from deciding on a carrier, locating freelancers, constructing a website, getting customers, and coping with orders. Whether you are a student, freelancer, or stay-at-home parent, this manual will help you build a business without needing advanced technical skills.
Choose the Right Service
The first step is selecting a carrier that people need and are willing to pay for. Popular options for drop servicing include:
- Logo design
- Social media control
- Video editing
- SEO services
- Content writing
- Website development
For example, you may have noticed that many corporations on Instagram need more posts; you can provide “Instagram content material creation” as your career. Make sure it is something in call for and that you can locate the right freelancers for it at a lower fee.
Tip: Use freelance sites like Fiverr, Upwork, or Freelancer.com to see what services are trending.
Understand Your Customers
Before launching your business, consider everything about your customers. Are they small business owners, online coaches, startup founders, or college students? Knowing your audience helps you form your service and your message. For example, if you are targeting online clothing brands, they might desire product photography editing or ad copywriting.
Write down:
- What troubles do your clients face?
- What solutions can you provide?
- Why would they pick your services over others?
This fundamental planning enables you to stand out in a competitive market.
Find Skilled Freelancers
Once you know what services you will provide, you need a person to do the work. You can discover proficient freelancers on:
- Fiverr
- Upwork
- PeoplePerHour
- Freelancer.Com
Look for people with suitable opinions and examples in their past work. Test them with a small task before trusting them with a paid order. Try to build a small group of 2-3 freelancers so you usually have someone to be with while you get orders.
Example: If you offer blog writing, find a creator who delivers high-quality content on time. You might pay them $20 for a blog post; however, rate your customer $50. That way, you earn $30.
Set Your Prices and Make Service Packages
Create clean service packages with fixed charges. Do not confuse your customers with too many options. Offer three ranges:
Basic: Simple, fast provider
Standard: More specific work with more features
Premium: Full provider with extra guide
For example, if you are selling video modifying services:
Basic: 30-second clip, no music
Standard: 1-minute video with background music
Premium: 2-minute video with transitions, music, and subtitles
Make certain your charges are sufficient to encompass your freelancer’s cost and your earnings.
Build a Simple Website
You do not want to be a tech expert to begin with. Use website developers like:
- Wix
- WordPress
- Shopify
- Squarespace
Your website needs to truly explain for:
- What services do you provide?
- Why should a person pick you?
- How to place an order?
- Your contact information
Add testimonials or examples if feasible. You can even begin with just one service and expand later. If you want to boost your brand, check out this guide on building your LinkedIn personal brand.
Start Finding Clients
Now that you are prepared, it is time to get clients. Here are a few easy ways:
- Post your services on Facebook or LinkedIn for groups associated with small companies.
- Message clients immediately on LinkedIn.
- Join freelance websites and provide your services there.
- Run a small advert marketing campaign on Instagram or Google.
Also, provide discounts on “first free project” deals to construct trust and get reviews. Ask your satisfied customers to refer others.
Example: If you provide content writing services, message startup founders and offer to write
their homepage content for free in exchange for an overview and referral.
Manage Orders and Deliver on Time
You are the bridge between your customer and the freelancer. Once you get an order:
- Confirm the details with the customer.
- Share the project with your freelancer.
- Check the final work before sending it to the purchaser.
- Ask for feedback and make revisions if needed.
Always meet deadlines and reply speedily to messages. A good provider leads to repeat customers and more income.
Stay Organized and Legal
Keep track of your earnings, fees, and orders. You can use Google Sheets or tools like Trello or Notion. Also, depending on your state, you may need to register your business legally and pay taxes.
Use easy contracts or agreements with freelancers to avoid confusion. Tools like HelloSign or DocuSign can assist with that.
Final Tips to Grow Your Business
Once you begin getting ordinary clients:
- Improve your website and branding
- Add greater offerings (like selling digital products on Etsy or creating a digital planner)
- Automate tasks like emails and payment monitoring
- Hire a digital assistant if you want
Drop servicing is all about smart planning, direct conversation, and robust partnerships. You do not need to do the work yourself. However, you simply should manage it well.
Conclusion
Drop servicing is a smart way to begin an online business with low expenses and low risk. You do not need unique capabilities, just the ability to arrange, speak, and clear up issues. By following the steps on this blog, you can begin your very own drop servicing business nowadays and construct a source of earnings that works for you, no matter where you are.
If you are ready to get started, pick your services and take a look at your first freelancer. Always remember, every huge enterprise starts with a small step!

In today’s digital world, TikTok has evolved into more than just an entertainment app. It is now a powerful platform for business growth. Whether you are a small business owner, content writer, or startup looking to grow on platforms like TikTok or LinkedIn, these tools offer unique chances to connect with your audience and boost your visibility.
In this blog, you will analyze exactly how to use TikTok to promote your brand in easy, realistic steps. We will cover why manufacturers grow so quickly on TikTok, share validated guidelines to boost your reach, and explain how to turn views into potential clients. If you have been thinking about how to get started or the way to stand out on TikTok, this guide is for you.
1. Why Do Brands Grow on TikTok?
TikTok enables manufacturers to develop speedily because even a small account can reach a large target market without spending a lot of money. The platform rewards videos that get excellent engagement, likes, comments, shares, and watch time. If people enjoy your video and keep watching it, TikTok will display it to more users, even if you are new or have only a few fans.
Many small corporations have seen a large increase in income simply from TikTok. For example, even cottage cheese manufacturers became popular, thanks to the recipe trend on the app. Campaigns like Chipotle’s #GuacDance, where people joined by using the brand’s hashtag, got millions of views and increased sales.
What works on TikTok is being real. People love content that feels natural, funny, or non-public, not overly polished or corporate. Brands that display their actual character, use humor, or speak honestly tend to connect better with TikTok customers and build strong trust.
2. Tips For Growing Your Brand on TikTok
• Post regularly, but focus on quality
Try to post 2 to 5 times per week. Stay regular so your followers recognise when to expect new content. Use TikTok’s analytics to discover the best times to post when your target audience is mostly active.
• Use trending sounds and hashtags wisely
Trends can help your video get followed, but do not comply with each trend blindly. Choose sounds and hashtags that fit your brand. Use a mixture of popular and niche-specific hashtags to reach the right audience. These techniques also work well on Instagram Reels if you plan to share your content across platforms.
• Stay active and respond quickly
Reply to comments, solve questions, and show you are paying attention. You can even use TikTok’s “respond with video” feature to show a comment in new content. Engaging with followers enables you to construct a loyal fan base and makes your content more visible.
• Share user-generated content material (UGC)
Encourage your customers to duet, stitch, or recreate your videos. You can also start a hashtag assignment. When users generate content about your brand, it spreads clearly and facilitates building trust.
• Work with influencers
Partner with micro-influencers (those with 5k–50k fans) who suit your brand values. Let them create content in their own style. It feels more real and gets higher engagement.
• Try livestreaming and TikTok Shop
Going live helps you to communicate directly to your target market, display your products, and answer questions in real time. TikTok Shop also lets customers buy directly from your store or profile, which is especially useful if you sell digital products on Etsy or other platforms.
• Use commercials when needed
TikTok Ads Manager offers you distinctive ad options like in-feed advertisements, spark ads (which increase your very own posts), branded filters, or hashtag demanding situations. When used correctly with natural content, ads can bring even greater interest to your logo.
• Learn from analytics
Do not simply take a look at likes. Pay attention to how long people watch your videos, what numbers of saves or share them, and what content material receives the most interplay. Use this information to improve future videos.
• Try fun and interactive content material
TikTok offers filters, polls, AR effects, and gamified ads. These interactive formats make your content material more enticing and keep people coming back for more.
3. How Do I Promote My Brand on TikTok?
Promoting your brand on TikTok is all about being real, visible, and connecting with humans. Start with the aid of creating a clear plan.
First, recognise your audience. Are you speaking to students, splendor fans, parents, or green customers? Your content material must be in the shape of what your target audience cares about.
Mix your content material. Share normal videos, UGC, and collaborations with influencers. You can also run ads or sponsor some posts when needed.
Get creative with branded hashtag challenges. For instance, ask customers to share a dance, a recipe, or a fun use of your product. This encourages people to have interaction and share your brand with their very own followers.
Show behind-the-scenes moments, purchaser evaluations, or how your products are made. These kinds of videos build loyalty and display that your brand is more than just a product.
Go live to launch new objects, answer questions, or run unique promotions. Live sessions feel personal and assist humans to connect with your brand in real time.
Finally, raise your best content by turning it into spark advertisements. If a video is performing well, this is a brilliant way to reach more human beings without beginning from scratch.
4. How Do Brands Grow on TikTok?
Brands develop on TikTok by capturing attention quickly and inspiring meaningful engagement. The platform’s unique set of rules promotes content material based on interest, not follower count number. It gives manufacturers of all sizes a chance to go viral. When videos connect emotionally or entertain, they are much more likely to be shared and replayed, leading to rapid growth. Companies like Printful, Shopify, and Single Grain highlight the importance of creating relatable and authentic content material that resonates with viewers. TikTok is not just about trends. It is about building real connections with your target audience through creativity, consistency, and community involvement.
5. Put it into Action: A Checklist For Growing Your Brand
1. Set up a TikTok Business account and search your niche content for ideas. If you need help with branding, check out this free logo design guide to create a strong visual identity.
2. Plan a posting agenda (2–five times/week), select themes or series.
3. Research trending sounds and hashtags that suit your logo voice.
4. Share content material that informs, entertains, or inspires. Keep it authentic.
5. Encourage comments and User generated content. Reply rapid and in fun ways.
6. Partner with aligned micro‑influencers or creators out of your area of interest.
7. Host a branded hashtag challenge or live stream event
8. Use analytics to refine timing, style, and what themes works great
9. Try ads or spark ads to increase your best-performing content.
10. Iterate regularly with new formats—like polls, duets, AR filters
Final Words!
To develop your brand on TikTok, you do not need massive budgets, just smart, steady strategy, and real connection. Focus on how do manufacturers develop on TikTok? By building community, sparking participation, and balancing fun with value. You can also explore ways to earn passive income using AI to support your growth journey. Ask yourself: How do I sell my brand on TikTok? By blending creativity, authenticity, and strategic optimization.
Stick with it, research from what works, stay authentic to your voice—and in particular, enjoy the process. TikTok rewards creativity, spontaneity, and real human connection. That is where your logo will discover its rhythm and its target audience.

Have you ever thought of making money while you are sleeping soundly? Indeed, it is like a dream. But, what if I tell you that in the present time, you can do it? The concept of earning money while you are dozing is now possible due to AI (Artificial Intelligence). It is genuinely feasible now.
Whether you want to run a YouTube channel without showing your face, promote digital products online, or build simple chatbots, AI tools allow you to make earnings with AI in smart and low-effort ways.
Let us observe how you could get started with real thoughts you can try.
How Does AI Help You Make Passive Income?
AI tools can do tasks that used to take you hours, like writing blog posts, making videos, designing graphics, or answering customer questions. Once you have created your system (like a website, video channel, or chatbot), it can continue running and earning money for you in the future.
AI Web Development (No Coding Needed)
Even if you do not understand how to code, AI web development equipment like Div-idy or Framer AI can assist you in building websites. You, in reality, write what you want (as an example, “a weblog for digicam reviews”), and the AI creates a site with pages, pictures, and buttons.
You can use these websites for blogs, product evaluations, or small business pages. Once the site is live and running, you can make money with the help of displaying commercials or including affiliate hyperlinks (where you earn cash if someone clicks and buys something). After the primary setup, the web page can continue earning passively.
Example: Someone creates a blog using AI to check travel tools. They submit 50 AI-written articles, upload Amazon affiliate hyperlinks, and make cash every time a person clicks and buys.
Create and Sell AI-Written Content
AI writing tools like ChatGPT and KoalaWriter let you create eBooks, journals, workbooks, or templates in no time. You can then sell them on systems like Gumroad, Amazon, or Etsy.
The best element? You only need to create the content once, and you may sell it over and over while not having to remake it.
Example: Write a 25-page children’s storybook using AI, design a lovely cover with the help of Canva, and put it up on Amazon. Each time someone buys it, you earn money with no extra work.
Promote AI Tools as an Affiliate
Many AI businesses provide affiliate applications where they pay you for recommending their tools. You do not need to build your product; simply promote theirs.
Popular tools like Copy.Ai, Pictory, Murf, or Synthesia come up with a special hyperlink. If someone clicks your link and signs up, you earn a commission each month.
Example: You run a blog about online business recommendations. You write an assessment of Jasper AI and include your affiliate link. When 10 humans sign up through your link, you earn cash each month.
Build and Sell Chatbots Using AI
Businesses are continually seeking out help with customer service or sales. You can construct AI chatbots to answer questions, take orders, or guide customers, and promote this as a provider.
Tools like ChatGPT API, Botpress, or ManyChat make this clean, even without coding skills. You can charge businesses a setup fee and a monthly fee for keeping the chatbot.
Example: You create a chatbot for a bakery that takes orders and answers common questions. You charge $200 to set it up and $50/month to keep it running.
Use AI for YouTube Video Creation (Without Showing Your Face)
Do you want to be on a camera? No issue. With AI equipment like Pictory, Synthesia, and ElevenLabs, you may make motion pictures from written scripts, complete with voiceovers, animations, and visuals.
You can earn money from ads, sponsorships, or affiliate links in your video descriptions. These “faceless” channels work properly for subjects like education, top 10 lists, or how-to guides.
Example: A channel that posts AI-made videos about space records grows to 10,000 subscribers. It earns cash from commercials and hyperlinks to a telescope affiliate application.
Graphic Design with AI
You do not want to be a designer to make excellent snapshots anymore. Tools like Canva AI and Midjourney help you create digital paintings, posters, and T-shirt designs.
You can add your designs to sites like Redbubble or Teespring where people can buy them on mugs, hoodies, or stickers. These systems handle printing and delivery for you.
Example: You design 25 funny quote T-shirts with AI and sell them on Etsy. When a person buys, the platform prints and supplies it. You get paid robotically.
Sell AI-Made Digital Products
Besides eBooks and designs, you can sell things like Notion templates, AI activities, purpose planners, and graphics packs. Once created, those digital files can be sold on websites like Teachable, Podia, or your website.
Example: You use AI to create a “30-Day Self-Care Planner” PDF and sell it for $7. If 100 people purchase it, that is $700 earned without delivery or stock.
Create Online Courses with AI Help
If you are proficient at something (like painting, cooking, or social media handling), AI tools let you create a complete online course. Use ChatGPT to plan lessons, then use tools like Synthesia or Pictory to turn them into movies.
Upload your route on Udemy, Teachable, or your website and earn money on every occasion someone signs up.
Example: You make a novice Photoshop course with AI and publish it. You sell it on social media and slowly start earning from enrollments every month.
Mix and Match for More Results
Many successful people combine several of these techniques. For instance, one person might also run a weblog (with associated hyperlinks), construct a chatbot, and sell an AI-designed planner—all running together to grow earnings through the years.
Be Realistic
AI makes it less difficult to build passive earnings streams, but it is not an instant process. You nevertheless need proper ideas, clear goals, and persistence. Do not believe anyone who guarantees “get wealthy quickly.” Most fulfillment comes from setting things up neatly and giving them time to develop.
Final Thoughts
AI gear is like a helpful assistant. They can help you build websites, create movies, write content material, or design products a lot quicker than before. Whether you begin with one blog or a YouTube channel, you could develop your earnings with AI over the years.
Start small. Pick one idea. Try it out. As you learn, you may add more and build a system that earns for you, even as you sleep.

If you have ever had an idea about selling online, but did not want to deal with delivery, packaging, or coping with stock, you can do it with digital products. They might be the perfect solution for you. One of the simplest platforms to begin with is Etsy.
In this blog, we will walk you through how to begin selling products on Etsy, mainly digital products like printables, templates, planners, and more. Whether you are a designer, author, or just a person with creative ideas, you will examine everything you need to recognise to get started.
What Are Digital Products?
Digital products are documents that clients can download and use right away. No shipping is needed. Some popular examples include:
- Printable planners and calendars
- Wedding invitation templates
- Wall art prints
- Resume templates
- Budget trackers
- Digital planners
- Educational worksheets
Once you create and add them, they can be sold again with no more work!
Why Sell Digital Products on Etsy?
Etsy is well-known for hand-crafted and innovative items, but it is additionally one of the best platforms for selling digital products. One huge purpose is how novice-friendly it is. The setup system is simple and does not require any technical abilities. Etsy also has a large audience, with millions of people visiting the site every month, looking for precise and beneficial items.
Plus, the startup expenses are low. You do not need to spend money on materials, packaging, or delivery because digital products are downloaded instantly. Another massive benefit is the chance to earn passive earnings. Once you create and add a product, it can be sold over and over without any further changes. If you are asking yourself, “Is it worth selling merchandise on Etsy?” The answer is truly yes.
Many sellers are making steady profits, with some incomes of hundreds or even thousands of dollars online each month, simply from their digital downloads.
Step-by-Step: How to Sell Digital Products on Etsy
Let us smash down the steps that will help you get started.
1. Choose Your Niche
First, think about what kind of virtual products you need to sell. Choose something you are a top at or are interested in. Niches that do well include:
- Personal organization (planners, to-do lists)
- Small commercial enterprise tools (bill templates, social media kits)
- Education (printables for kids, instructor resources)
- Art and design (posters, coloring pages, virtual wallpapers)
Tip: Do a few studies on Etsy to see what is already promoting, then think about how you may do it in another way or more elevated.
2. Create Your Product
Use layout gear like:
- Canva (top notch for beginners)
- Adobe Illustrator or Photoshop (for advanced layout)
- Procreate (for hand-drawn artwork)
Make sure your documents are extremely nice and easy to apply. Save them in popular formats like PDF, PNG, or JPG.
3. Set Up Your Etsy Shop
Go to Etsy.com and click “Sell on Etsy”. Follow the prompts to:
- Name your shop
- Add a profile photo and shop banner
- Write a brief bio and shop description
Choose a name that fits your brand and sounds innovative yet clear.
4. List Your Digital Product
When you are all set to list your product on Etsy, start by deciding on “Digital” because the product type lets shoppers realize it is a downloadable item. Then, add your files. Etsy allows as many as 5 files per listing, or you may integrate the entirety right into a single ZIP folder for easy access. Create a clean and catchy title that includes applicable key phrases to help your product get noticed.
In the description, explain exactly what the buyer will receive and how they could use it. Make sure to add tags associated with your product, along with “printable planner” or “digital budget template,” to improve visibility in search results. Finally, set an honest charge by checking what similar objects are selling for, so your listing stays competitive.
5. Promote Your Product
Although Etsy already brings in a whole lot of traffic, promoting your listings on your account can make a considerable difference. Sharing your products on social media structures like Instagram, Pinterest, and TikTok enables you to reach more potential shoppers who are probably interested in your niche.
You can also start a blog or website in which you provide helpful recommendations related to your product, which builds credibility and drives visitors to return to your Etsy shop. Offering a free digital item in exchange for an email address is another smart way to grow your target audience.
Additionally, the usage of Etsy advertisements can boost your product’s visibility on the platform. Simply put, the more people who see your product, the better your chances are of making extra income.
6. Deliver and Support
Since digital items are automatically delivered after purchase, Etsy takes care of sending the files to the client. However, it is nonetheless important to provide clear commands, especially in case your product requires modification or printing.
Make sure your customers understand how to use the documents they have downloaded. Also, respond to any messages promptly and politely. A good verbal exchange suggests professionalism and care. If any troubles arise, be ready to update or fix the product as required.
Offering splendid customer support not only builds consideration but additionally increases the probabilities of getting repeat shoppers and positive critiques.
Is It Worth Selling Products on Etsy?
For many people, selling products on Etsy is completely worth it. It is ideal for side profits, in particular if you enjoy creating and want to earn a living from home.
Here are a few pros and cons to remember:
Pros:
- Low risk and low cost
- No stock or transport complications
- You can earn passive profits
- Easy to test new thoughts
Cons:
- Etsy takes costs (listing and transaction)
- You will need to stand out in a competitive market
- You are responsible for marketing your shop
If you are innovative and inclined to study, Etsy is a great place to construct a digital product business with very little upfront funding.
Final Tips for Success
Keep gaining knowledge of what works by checking the aid of checking top dealers in your niche.
- Use SEO-friendly titles and tags so more people can find your listings
- Bundle your products to offer more value (like a 3-in-1 planner set)
- Ask happy clients to share their opinions
- Be patient, success does not manifest overnight, but constant attempt pays off
Wrapping It Up
Selling digital merchandise on Etsy is one of the simplest ways to start selling online. You do not need to be a tech professional or an artist, you simply need an idea, a piece of creativity, and the willingness to learn.
So if you have been thinking about selling products on Etsy, now is the time to give it a try. With low cost, high capability, and lots of tools available, your digital shop will be only a few clicks away from success.

Starting a small business from home is not just a wish anymore. It is a smart and sensible way to earn money and enjoy extra freedom in your everyday life. In 2025, many people are turning their ideas into home-based businesses. If you have been considering doing the same, this easy manual will walk you through each step.
Why Is 2025 Is a Great Time to Start a Business from Home?
Today, many people like flexible jobs where they can work on their terms. With job adjustments and layoffs becoming more common, a number of people are constructing their personal small businesses to feel secure and live on top of things in their future.
The good news is that starting a business is less difficult now than it used to be. You do not need to be a tech professional or have a lot of cash to start. Thanks to simple online tools, apps, and beneficial structures, you can release and run a business right from your private home.
There are also many low-fee business ideas, like freelancing or selling goods online, that do not need a lot of money to get started.
Choose a Home-Based Business Idea That Suits You
Before you begin, consider what you are good at, what you love doing, and what people want. Here are a few excellent business ideas you could run from home in 2025:
Freelance offerings: Offer skills like writing, image layout, digital assistance, bookkeeping, or website development. These corporations don’t require you to stock products and are easy to begin.
Digital marketing and social media management: Many businesses look for help to handle their online presence. If you realize how to use social media, this can be an amazing opportunity.
Online stores: You can begin an e-commerce store using dropshipping, print-on-demand, or selling on systems like Amazon. In this manner, you would not need a bodily save or a huge storage space.
App development or tech offerings: If you have a background in technology, you may provide services like app creation, web design, or tech support.
Handmade products and crafts: If you enjoy making things, keep in mind selling hand-crafted jewelry, home decor, or paintings. You could also provide online training or courses.
There are many different ideas available, too, from pet accessories to selling digital products. Think about what fits your abilities and hobbies nicely.
Check if Your Business Idea Will Work
Before completely launching your business, it is a good idea to test whether people are interested in what you are presenting. Ask yourself simple questions like:
- What trouble do my services or products solve?
- Who will buy it?
- What do I want to earn with this business?
You can run a small survey, offer an ordeal model, or tackle a few customers as a side challenge to see how it goes. This helps you examine what works and what desires improvement earlier than if you invest an excessive amount of time and money.
Handle the Basic Legal and Financial Setup
To have your business secure and legal, comply with those easy steps:
Choose a business type: You may be a sole owner or register as an LLC, depending on what works for you. Each kind has its very own rules for taxes and legal safety.
Open a business bank account: It is smart to hold your business money separate from your
private funds. This makes it less difficult to manage your earnings and expenses.
Get licenses and permits: Some businesses need a permit or have to follow local policies. Check what is required in your area before you start.
Apply for a tax ID (EIN): Even if you are operating alone, having an EIN enables you to maintain your tax records clearly and professionally.
Make a Simple Business Plan and Budget
A desirable plan does not have to be complicated. Write down your business objectives, who your customers are, the way you will market your offerings, your startup expenses, and the way you will take care of your daily obligations. A plan gives you a course and improves your chances of fulfillment.
Also, create an easy budget. Include constant expenses (like software or licenses) and variable costs (like advertising or materials). If you want additional money, you could use private financial savings, small loans, or try crowdfunding on websites like Kickstarter, GoFundMe, or Indiegogo. Start with a business idea that does not require a lot of money in advance.
Build Your Online Presence
Most organizations today want a strong online presence. You can:
Make an easy website: Use effortless website builders like Wix or WordPress to expose your offerings and contact details.
Use social media: Share posts on platforms like Instagram, Facebook, or TikTok to connect
with people and display your work.
Start content marketing: Create a blog, YouTube channel, or useful posts to build trust and appeal to potential clients.
Use Affordable Marketing to Grow
When beginning out, you do not need a huge advertising and marketing budget. Try these easy approaches to spread the word:
- Reach out to friends and family and ask them to share your business with others.
- Encourage referrals via offering discounts or rewards to happy clients who refer new customers.
- Use low-price ads on Facebook or Google in case you need to target precise businesses.
- Partner with different small groups for cross-advertising.
Use Helpful Tools and AI
Technology can save you effort and time. Use free or low-cost tools like Notion for organizing responsibilities, Canva for designing posts, or Buffer for scheduling social media. In 2025, AI equipment is also becoming popular for writing plans, handling customer support, or developing marketing content. Learn a bit about these tools. They may provide you with a huge gain.
Manage and Grow Your Business Smartly
As your business grows, be aware of what is running and what is not. Keep track of your profits, costs, and patron comments. Focus on your exceptional-selling services or products and enhance them over time.
Also, set up systems to make your work easier. Use templates, hire a freelance assistant, or outsource small tasks while you get busy. This way, you could save time and grow easily.
Stay Positive and Keep Learning
The first few months might feel tough; however, do not surrender. Stay a patient person and be open to learning. Join online groups for business owners, examine useful blogs, and take small guides to enhance your abilities.
Free resources like SBA guides, enterprise boards, and local entrepreneur businesses can also offer recommendations and guidance when you want it.
Final Thoughts
Starting a small business from home in 2025 is a clever and low-cost way to build a higher destiny. Whether you want greater earnings, a full-time career, or extra freedom for your life, now is the right time to start.
Take your first step today, think about a business concept, or write down a brief plan. Great matters mostly start small, and with steady attempt, your idea can develop into something excellent.
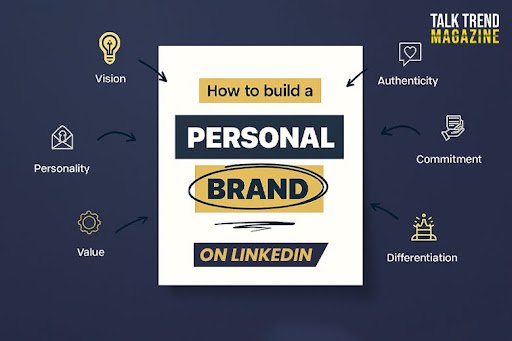
In the present-day virtual world, your online presence is more important than ever, in particular on expert systems like Linkedin. Whether you are seeking a job, an entrepreneur, a freelancer, or someone aiming to grow in your profession, building a personal logo on Linkedin can open doorways to endless possibilities. But what does that imply? And how do you get started without feeling awkward or overly promotional?
This blog will walk you through simple, effective approaches to build your personal brand on Linkedin naturally and authentically.
Start by Defining Your Brand
Before you dive into updating your profile or posting content, take a second to reflect on what your private brand will represent. Think about your center strengths, attractions, and professional values. What subjects do you care about? What makes you stand out from others in your area? Who do you need to reach to attain potential employers, customers, collaborators, or peers? Having a clear concept of what you stand for and who you are addressing will guide your activities on Linkedin and assist you in creating a regular, authentic presence.
Optimize Your Linkedin Profile
Your Linkedin profile is your digital business card. It is often the first factor people see after they stumble upon your call. Make certain it leaves a strong, high-quality impact. Start with a professional photograph that is clear, friendly, and approachable. A simple headshot with proper lighting works fine.
Next, pay attention to your headline. Rather than just listing your job identity, use this area to exhibit what you do and what value you convey. For example, in preference to “Marketing Manager,” you may write, “Helping businesses grow through innovative digital marketing techniques.”
The ‘About’ section is your chance to tell your story in your own words. Write this as if you are speaking to a brand new connection, explain your expert journey, what excites you about your work, and what you are hoping to gain. Keep it simple and honest.
Do not forget to update your abilities, experiences, and achievements. Add a custom banner photo that displays your character or industry. Small information like that helps your profile stand out and feel polished.
Share Content That Matters
Once your profile is in proper form, the following step is to become active by sharing valuable content. This does not suggest that you need to post every day or attempt to go viral. Focus on topics that depend on you and your target audience. You may share industry news, insights from your work, or training you have learned in this manner.
An excellent rule is to be helpful rather than looking promotional. Think about what your target market would possibly find thrilling, inspiring, or useful. Mix things up, you may share articles, write short posts, ask questions, or maybe upload videos and photos that are relevant. The secret is to stay steady and maintain your content connected with your private brand message.
Engage with Your Network
Building a personal brand is not all about posting your content. It is also about interacting with others. Spend a bit of time each week to attract along with your connections’ posts. Leave considerate feedback, answer questions, and join conversations on topics you care about. This facilitates you to stay visible in your community and indicates that you are simply inquisitive about what others have to say.
When sending connection requests, always customize your message. Mention how you got here from their profile or what you found exciting about their work. An easy, friendly message could make your invitation noticeable and increase the probability of a meaningful connection.
Build Meaningful Relationships
Over time, the intention is to turn those connections into relationships. Do not be afraid to send a quick message to congratulate a person on a new position or thank them for an insightful submission. If you come upon a useful resource or article, share it with them.
You can also take part in applicable Linkedin companies where specialists in your industry share ideas and possibilities. These communities can be a high-quality place to connect with like-minded people, be part of discussions, and develop your expert circle.
Use Creator Mode to Boost Visibility
Linkedin’s Creator Mode is a useful function in case you plan to publish content frequently. By turning it on, you may benefit from new tools like highlighting your exceptional posts, featuring hashtags associated with your expertise, and encouraging others to follow you. This small adjustment can make a significant difference in how your content plays and the way people discover your profile.
Keep Learning and Adjusting
Personal branding is not something you set up and forget about later. It is not a one-time thing but evolves with time. Pay attention to the posts that get the most engagement and what kind of conversations resonate with your target audience. Use Linkedin’s integrated analytics to see how your profile and posts are performing. These statistics can guide you in refining your content material and networking strategies.
Remember, it is expected for things to develop slowly at first. Do not get discouraged if your early posts do not get a lot of attention. Consistency and authenticity go a long way beyond instant reputation.
Final Thoughts
Building a private brand on Linkedin does not require you to be a social media expert or have heaps of followers. It is about offering yourself, sharing useful thoughts, and connecting with people in your field in a proper way. Start by defining what you need to be acknowledged for, optimize your profile, put up applicable content, and actively interact with others.
Most importantly, be yourself. People hook up with honesty and personality, not polished perfection. As you stay consistent, you will naturally construct a recognition and network that can assist your professional goals for years to come.
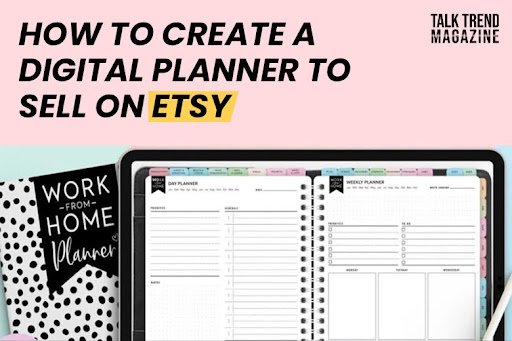
Have you ever thought about turning your creativity into a product you can sell online? One amazing idea is to create a digital planner and sell it on Etsy. Digital planners are like notebooks that people use on their devices, like iPads, phones, and laptops, to stay prepared. They come with pages for daily duties, calendars, habit trackers, and more.
However, in preference to being on paper, they are digital files humans download and use in apps like GoodNotes or Notability.
In this easy guide, you will learn how to sell on Etsy by developing your personal digital planner. I will provide an explanation for the steps in an easy manner and give examples that will help you get started.
1. Find a Good Idea for Your Digital Planner
Before making anything, it is an amazing idea to look at what is already in demand. Go to Etsy and look for “digital planner.” You will see lots of different planners like fitness planners, meal planners, finances planners, or planners for college kids. This will help you spot what humans like to buy.
For instance, if you note many planners for instructors but none for homeschooling parents, you can create one only for them. Choosing a unique subject matter or style can help your product stick out from others. That is how many successful Etsy dealers begin, by finding a little corner of the marketplace that is not too crowded.
2. Plan and Design Your Digital Planner
Once you have picked your idea, consider what pages you want to include. Most digital planners have sections like:
- Yearly calendar
- Monthly and weekly making plans pages
- Daily to-do lists
- Habit trackers
- Notes pages
For instance, in case you are creating a fitness planner, you may include pages for monitoring water intake, workout exercises, and frame measurements.
When you are prepared to design, you could use unfastened and clean tools like Canva or Google Slides. Canva is incredible as it has templates you may customize without needing design experience. If you need to make superior designs, tools like Adobe Illustrator or Affinity Designer work too; however, they take more time to learn.
3. Make It Clickable and Save It the Right Way
A right digital planner lets human beings easily jump from one page to any other by tapping links. For example, if a person taps on “March” on the cover page, it needs to take them immediately to the March planner page. This is referred to as adding “links” to your pages. Most programs like Canva and PowerPoint can help you try this.
After you finish designing and linking, keep your planner as a PDF file because that is the kind of record most human beings use in planner apps like GoodNotes.
4. Set Up Your Etsy Shop and Create a Listing
Now comes the exciting part: selling your planner on Etsy. If you have not already got an account, visit Etsy.com and sign up as a dealer. It is free to open a shop, but they charge a small fee (about 20 cents) for each product you list.
When creating your product listing:
- Use a precise and exciting name. For example, in place of just “Planner,” write “2025 Fitness Digital Planner for GoodNotes and iPad.”
- Add a good description explaining what is inside the planner, what apps it really works with, and how to use it.
- Upload your virtual planner document and include a few instructions for clients, like how to download and open it in GoodNotes.
- Etsy additionally asks for keywords referred to as tags. Use phrases people would possibly search for, like “digital planner,” “student planner,” or “finances planner.”
You can check how other shops write their listings by looking for comparable products and reading their titles and descriptions.
5. Make Your Planner Look Good in Photos
Even though your planner is a digital report, you may need snapshots for your Etsy listing. You can take screenshots of your planner pages or use Canva to make screenshots that show what your planner looks like on a tablet screen. This facilitates customers to use it themselves.
For example, you could create a photograph displaying your planner open on a tablet next to a cup of coffee and a pocket book. People love seeing how your goods may fit into their regular existence.
6. Promote Your Planner and Get Found with The Aid of Customers
When your planner lives on Etsy, human beings need a way to discover it. Etsy makes use of keywords to identify and tags to decide which products to show in search results. So the usage of words like virtual planner and how to sell on Etsy naturally for your title and outline can help your product appear in searches.
You can also inform human beings about your planner on social media like Pinterest, Instagram, or TikTok. For instance, you could make a brief video showing how your planner works on an iPad. Many dealers say Pinterest is particularly accurate for selling digital planners because humans often use it for business enterprise and productivity thoughts.
7. Keep Learning and Improving
After you begin selling, take note of what your clients say in their opinions. If several human beings ask for additional pages or a specific layout, you may replace your planner or create a new version.
You can also test with different styles of planners. If your fitness planner sells well, you may strive to make a meal planner or a student’s study planner. The more useful products you have, the greater the chances humans will buy from your store.
Why Digital Planners Are a Great Product to Sell
Digital planners are one of the easiest and most economical products to sell online. You design them once and can sell the same file time and again, which means you do not need to worry about shipping or keeping stock. Plus, more human beings are switching to virtual equipment for organizing their lives, so the demand is increasing each year.
For example, a few Etsy sellers have shared that they commenced making some sales per week, and after some months of learning what customers wanted, they were making day-by-day sales without further work.
Final Thoughts
Selling a virtual planner on Etsy is a fun and smart way to earn money from your creativity. Now that you recognize the way to promote on Etsy, you could start by selecting an amazing idea, designing your planner with easy gear like Canva, developing a list with clean photographs and descriptions, and selling it to the proper target market.
With a bit of effort and creativity, you could construct a small online commercial enterprise from your house, no huge investment needed. Give it a try and see which one takes you!
No matter which business you are going to start, you definitely need a logo that defines your business type. Your logo is one of the first things people notice about your business brand. It represents who you are, what you do, and what you believe in.
A remarkable logo grabs interest and leaves a strong impression. The first-class part is that you do not need to spend money to create one.
In this easy guide, you will learn how to design your very own brand logo with the use of famous software like Adobe Photoshop, CorelDRAW, Canva Pro, and different free alternatives.
Start with a Simple Idea
Before you dive into designing, take a little time to gather thoughts. Start by finding out trademarks from different companies that are working in the same niche as yours. Notice what colorations, fonts, and shapes they use. This will assist you in spotting what works and what does not.
Next, think about the personality of your brand. Is it fun and friendly? Professional and critical? Or maybe green and herbal? Your logo has to suit the texture of your commercial enterprise.
It is a smart idea to grab a piece of paper and quickly sketch a few thoughts. Do not fear if they are not perfect — just mess around with symbols, letters, or icons that could hint at your brand. This easy step will help you design an unfastened logo that is precise and significant.
Choose the Right Software for Your Free Logo
There are numerous tools you can use to design an exceptional emblem without paying. Here is a short analysis of the exceptional ones and a way to use them:
Canva Pro / Canva Free
Canva is one of the simplest tools for novices. It comes with premade logo templates, icons, and fonts you may drag and drop into your design.
How to use it:
Create a free Canva account, begin a brand new “Logo” layout, and either select a template or start from scratch. Add your business brand name, select shapes, icons, and shades you like, and alter the whole thing till it appears proper. Canva Pro, the paid version of Canva, unlocks greater capabilities like custom brand kits to save your brand logo, colors, fonts, and size. However, you may make a notable free logo with Canva’s free version too.
Adobe Photoshop / Adobe Express
Photoshop is robust for detailed designs; however, if you do not have it, Adobe Express (a free online tool) is an outstanding alternative.
How to apply it:
Go to Adobe Express’s logo maker, type your logo name, select a font, and an icon. Adjust the colors, textual content, and format until you are satisfied. Save your brand in PNG or SVG format for clear, superb outcomes.
CorelDRAW (Free Trial or Lite Version)
CorelDRAW is a pro-level design tool, and even as it is generally paid, you can start with a free trial or a lighter version.
How to apply it:
Open a new file, integrate shapes, text, and icons to build your layout. Save your very last logo in formats like SVG for sharp, scalable outcomes.
Other Free Options
Inkscape: A free, open-source tool best for developing scalable vector logos.
Photopea: A free online Photoshop-style editor you can use for logos and images.
Logo Design Basics You Should Know
Vector vs. Raster
A vector logo remains sharp and clear at any length, whether it is on a business card or billboard. Use a tool like Inkscape or CorelDRAW for this.
A raster logo is manufactured from pixels and might get blurry when resized. Photoshop or Photopea works with these; however, it is better to make your logo brand as a vector if possible.
Pick the Right Colors
Stick with 2–3 colorings so your emblem seems clean and expert. You can use color tools like Coolors or Adobe’s color picker to find shade colors that suit your logo.
Choose Clear Fonts
Match your font to your logo’s style — playful, ambitious, modern, or classic. Make sure it is smooth to read, even at a small length. Both Canva and Adobe Express offer heaps of free logo-friendly fonts.
Keep It Simple
The best-designed logos are simple and clean to keep in mind. Think about how fundamental the Nike swoosh or Apple logo is. Avoid too much info and further decorations.
How to Build Your Logo in Each Tool
In Canva
Start a logo project, select a template or blank canvas, and update the text along with your brand name. Add icons, modify colorings and fonts, and download your free logo as a PNG or SVG.
In Adobe Express
Use their logo generator to type your business name, choose a font, and modify the design. Download your logo in high resolution.
In Inkscape / CorelDRAW
Create a brand new vector file. Use shape tools to build icons, upload your logo name with an appropriate font, and regulate the layout. Save as SVG for crisp quality.
In Photoshop / Photopea
Set your canvas size, use form equipment or upload icons, upload textual content, and polish with outcomes. Export as PNG for the web or PSD for layered documents.
Test and Finalize Your Logo
Before you wrap up, check your logo to confirm it seems correct everywhere. Zoom inside and outside to test if the details are thoughtful. View it in black and white to see if it still makes an experience without coloration. Also, preview it on items like your website header, business cards, or product mockups.
When it is geared up, keep unique versions:
For websites: PNG with a transparent background
For printing: High-resolution SVG or PDF
For modifying later: AI, PSD, or SVG file
Simple Tips to Make Your Logo Look Professional
A few quick pointers can assist your unfastened brand stand out:
Stay steady: Use the same colorings, fonts, and style in all your brand materials.
Balance your layout: Make sure your logo factors are evenly spaced and aligned.
Create different variations: Have each vertical and horizontal layout, with or without a tagline.
Ask for feedback: Share your design with friends or in online communities. Even a simple comment like, “I tried xlogo.pro, it is easy to use and receives appropriate outcomes,” can be helpful.
Final Thoughts
Creating your very own free logo is not as tough as it appears. With tools like Canva, Adobe Express, Inkscape, or Photopea and a bit of creativity, you could construct a logo that genuinely represents your business. Focus on keeping it simple, smooth, and useful in different formats. Before you know it, you will have a logo you adore — and the best part is, it will not cost a penny!

Instagram Reels can be an amazing way to increase your audience, but standing out among the hundreds of thousands of videos uploaded every day can be difficult. So, how are you making your Reels much more likely to go viral?
Here is a simple guide that will help you create Reels that present-day people want to look at, share, and interact with.
1. Start with a Strong Hook
The first few seconds of your Reel are the most vital. If you fail to capture their interest properly, they will swipe beyond your video. Try beginning with something surprising or appealing. It could be a bold statement, a thrilling truth, or a humorous second. For instance, in case you are doing a cooking Reel, you might show the finished dish first, then dive into the recipe. This makes people need to stick around to look the way you made it!
2. Keep It Short and Sweet
Even though Instagram helps you to make Reels as long as 90 seconds, shorter movies generally tend to perform better. Aim for around 7 to 15 seconds. Why? Because the shorter the video, the more likely someone is to look at it all the way through, which improves its chances of being visible by more people. For instance, a short 10-second dance video or a quick DIY hack often receives more attention than longer videos.
3. Use Trending Audio
Using popular tracks or sounds could make your Reel stand out and reach a bigger target audience. Instagram’s algorithm tends to push content that makes use of trending audio, so it is a smart idea to include it on your Reels. Just make certain the audio suits your content. For example, many viral Reels use amusing, energetic songs that improve the vibe of the video. You can check the trending songs and audio on Spotify.
4.Choose the Right Hashtags
Hashtags help categorize your video and make it easier for humans to find. But do not virtually throw random hashtags at your Reel. Instead, pick some particular ones related to your content material. For example, if you are posting a journey Reel, use hashtags like #TravelTips or #Wanderlust as opposed to widespread ones like #reels or #explorepage. This helps your video obtain the proper audience who is interested in what you are sharing.
5. Engage with Your Audience
The more human beings interact with your Reel, the more Instagram will display it to others. Responding to feedback or asking visitors to share their minds can encourage greater interplay. For instance, if someone gives feedback for your cooking Reel, reply with a tip or ask if they have attempted a similar recipe. When you have interaction with your target audience, they experience a greater connection with your content, which makes them more likely to share it.
6. Post Consistently
Posting frequently will increase your chances of going viral. If you always put up 3 to 5 Reels in step with the week, your target market will begin to expect and look forward to your content. It also continues to make you visible inside the feeds of your followers. For instance, accounts that submit humorous or relatable content material day by day, like comic Reels, frequently spread quickly because they keep showing up in humans’ feeds.
7. Watch Your Analytics
Instagram provides insights on how your Reels are performing, such as the number of people who have watched, appreciated, and shared them. By looking at videos that get the maximum engagement, you can discern what works and what does not. For instance, in case you notice that a specific kind of content material or a specific style of video is getting more views, you can focus more on that in your future posts.
8. Collaborate with Others
Collaborating with other creators is a superb way to get your Reels in front of a brand-new target audience. Find different creators whose content is just like yours and work together on a Reel. For example, in case you are into fashion, you could team up with a make-up artist and create a transition video. Collaborations help you reach new fans who are probably interested in your content.
9. Use Captions Effectively
Captions provide context for your video, explain your message, or upload humor. They can also encourage visitors to do so, like commenting or sharing. For example, in a travel reel, you may caption a beautiful shot with something like, “Would you go to this region? or Which place should I visit next? Let me discover the feedback inside!” This invites interaction and will increase engagement, which boosts your video’s chances of going viral.
10. Be Authentic
Authenticity is fundamental to growing content that people will hook up with. Viewers appreciate when you are dedicated to yourself. Do not try to reproduce what others are doing just because it is famous. Instead, concentrate on what makes you particular. If you are a foodie, share recipes or eating place reviews that mirror your personal flavor. If you are funny, allow your humor to shine. For instance, Reels where creators show their real selves, like trying out new trends or making mistakes, generally tend to perform well because they feel extra authenticity.
In Summary
Hook your viewers early: Grab their attention right away with something interesting or unexpected.
Keep it brief: Aim for 7 to 15 seconds to keep visitors engaged.
Use trending audio: Include famous songs or sounds that improve your content.
Select the appropriate hashtags: Choose specific hashtags relevant to your niche.
Engage with your target audience: Respond to remarks and inspire interplay.
Post consistently: Try to put up some instances every week to stay visible.
Watch your analytics: Track what works and regulate your strategy.
Collaborate: Partner with others to reach new audiences.
Use captions properly: Add context and encourage human beings to comment or share.
Stay authentic: Be yourself and show what makes you unique.
By following these steps, you may increase your chances of creating a viral Instagram Reel. Whether you are sharing a funny moment, showing a cool skill, or teaching something new, specializing in what makes your content material unique will help it stand out and get noticed!

Writing a children’s book is an awesome and creative way to share stories with the world. If you have ever imagined bringing to life a magical adventure, a heartwarming story, or a lesson-crammed journey for younger minds, then writing a kids’ book would possibly simply be the right outlet for you. The beauty of youngsters’ books is that they have the ability to teach, entertain, and inspire, sometimes all in only a few pages.
Whether you are trying to create colourful children’s image books that captivate toddlers or write testimonies for older kids that spark creativity and curiosity, the procedure may be both fun and pleasing. But it may also be a bit overwhelming. Where do you begin? How do you shape your ebook? And what steps do you need to take to get it published?
In this guide, we will walk you through the complete process, from coming up with your story concept to locating the accurate way to publish and market your ebook. So, in case you are prepared to share your creativity with younger readers, let us dive in! Writing a children’s book is not just about crafting an amazing story; it is about making a lasting impact on young minds.
Know Who You Are Writing For
Before you start, consider who you are targeting and whether they can study your ebook. Children’s books are divided into age groups:
Ages 0–3: Books with simple words and flashy images.
Ages 4–6: Picture books with brief and funny stories.
Ages 7–9: Chapter books, which can be a bit longer and feature more specific stories.
Ages 10–12: Books for older kids with deeper stories and characters.
Understanding the age of your readers will help you decide what form of story to tell and what language to use.
Plan Your Story
Once you set the target market, it is time to think about your story. Here are some matters not to forget about:
Theme: What lesson or concept do you need to share with youngsters?
Characters: Who are the central characters, and what do they want?
Setting: Where does the tale take place? Is it real or imaginary?
Plot: What occurs in the beginning, middle, and end of the tale?
For photo books, keep your tale straightforward. Most photo books have around 1,000 words. Books for slightly older kids can be a bit longer, up to 10,000 words.
Write Your Book
Done with plotting a story? Now is the time to begin writing! Do not fear about getting it best at the beginning, just get your thoughts down. Once you have completed your first draft, make an effort to study it over and make improvements. Editing your work is important to make sure it is engaging and fun to read.
Illustrate the Book
In children’s books, photos are just as crucial as the tale. If you are writing a photo e-book, the pictures help tell the tale. If you can not draw, you can work with an illustrator. There are many proficient artists online who can assist in bringing your story to life. Make sure the images fit the feel of your tale and appeal to the kids you’re writing for.
Format Your Book
Your book should be in the proper format before it is set for publishing. If you are making plans to print your book, there are common sizes like 8.5”x 8.5” or 8” x 10”. For virtual books (e-books), the format is normally ePub or PDF. There are tools available, like Adobe InDesign or BookWright, that permit you to make your ebook look professional.
Choose How to Publish?
There are two foremost ways to get your children’s ebook out into the world:
Traditional Publishing
With traditional publishing, you send your manuscript to a publisher. If they like your book, they will help with editing, illustrations, printing, and selling your book. However, getting a publisher to simply accept your book may be competitive, and you would possibly want an agent to help you.
Self-Publishing
The self-publishing method demands that you do the whole lot yourself. You can use structures like Amazon Kindle Direct Publishing (KDP) to post both ebooks and printed books. This offers you extra control over the method and higher royalty bills, but it also means you are in charge of all of the work.
Publish Your Book
When your book is prepared, it is time to publish. If you choose self-publishing, you will upload your manuscript and book cover to the platform you picked. After setting your price, your book might be live and available for readers to buy. For conventional publishing, you may want to follow the publisher’s recommendations for filing your manuscript.
Market Your Book
After publishing your book, it is crucial to allow people to learn about it. Here are a few methods to market your children’s book:
Build a Website: Create a website where readers can learn more about your book and buy it.
Social Media: Share updates and amusing statistics about your book on social media platforms.
Connect with Schools and Libraries: Teachers and librarians can propose your book to their school students.
Book Readings: Visit local colleges, libraries, or events to read your book to kids.
Final Thoughts
Writing and publishing a children’s book is an amusing and worthwhile process. It takes creativity, making plans, and some hard work, but with the right steps, you could bring your tale into existence. Whether you make a decision to go with conventional publishing or self-publishing, there are plenty of options for getting your ebook into the hands of younger readers.
If you are geared up to start, do not hesitate to dive in. Writing a children’s book is an interesting adventure that may deliver pleasure to children anywhere!

Do you want to share your thoughts, your experiences, memories, or what you have learnt from life with a massive audience? Starting a podcast on Spotify provides a potent platform to share your opinions and wisdom from your adventures with a huge audience easily. Whether you want to start it for fun or to construct a community, Spotify makes it easy to get your podcast launched.
Here is a step-by-step guide to help you establish your podcast.
Step 1: Plan Your Podcast
Before you begin recording, take a bit of time to think about your podcast. What will your podcast be about? Is it about a particular subject matter you enjoy, like genuine crime, sports, fun, or personal growth? Think about your target market, too. Who do you need to listen to in your podcast? This will assist in deciding on the tone and manner.
Also, do not forget how you need your podcast to be based. Will you record episodes by yourself, or will you invite visitors? Think about how frequently you will release new episodes, will it be only one episode in a week, every other week, or maybe month-to-month? Lastly, decide on the period of each episode. Keeping a constant episode duration can help set expectations for your listeners.
Step 2: Set Up Your Recording Space
A good sound quality is fundamental to keeping your listeners engaged. We are sure that you do not want to spend a lot of money on a fancy gadget; however, make sure that you have at least the fundamentals. Firstly, get an amazing microphone that captures clean sound. If you are simply beginning out, you do not want something first-rate and high-priced, but make sure it is soundier than the built-in mic on your computer or phone.
Next, use headphones so that you can listen to your recording with no background noise interfering. Choose a quiet vicinity for recording. A room with soft furniture, like carpets or curtains, helps lessen echo and prevents undesirable sounds from getting out.
Step 3: Record Your First Episode
Once you have got your setup prepared, it is time to file. Start by writing an outline for your first episode. This will keep you on target and make sure you cover the whole thing you want to say. Do not fear having a word-for-word script unless you feel comfortable with that. It is satisfactory to just have bullet points.
When you are prepared, start to record! It is ok if you make mistakes, just pause and begin once more. If you are using a recording software program like Audacity (free) or GarageBand (if you are using a Mac), you may constantly edit your episode later. Just concentrate on speaking honestly and obviously.
Step 4: Find a Podcast Hosting Platform
To get your podcast on Spotify, you need an area to host your audio files. Spotify does not directly host podcasts, but it can hyperlink to your episodes from a web hosting platform. There are a few alternatives to pick from. One of the perfect alternatives is Spotify for Creators (previously called Anchor). It is free and helps you to upload your episodes and share them across multiple systems, including Spotify.
Other options include Buzzsprout and Podbean, which additionally provide podcast web hosting offerings with built-in functions like specified records and easy episode management. Choose a platform that suits your goals and price range.
Step 5: Submit Your Podcast to Spotify
Once your podcast is prepared and hosted, it is time to get it onto Spotify. First, create an account with Spotify for Creators.
Spotify will ask you to verify that you own the podcast, normally by verifying your email address. After submitting the information about your podcast, which includes its identity, description, and class, all you need to do is hit “Submit.” It usually takes a few days for your podcast to be authorized and show up on Spotify, but as soon as it is available, listeners can find and listen to it.
Step 6: Promote Your Podcast
Getting your podcast on Spotify is truly the beginning. To expand your target audience, you need to share it. A simple way to begin is by sharing episodes on social media, like Instagram, Twitter, or Facebook. Let your friends, circle of relatives, and followers know when a new episode is out. If you have already got an internet site or blog, you can put up display notes or more content there to help listeners engage further.
Another high-quality way to sell your podcast is by collaborating with other podcasters. If you can team up with someone who has a comparable huge audience, it will help each of you reach new listeners. Guest appearances, shout-outs, or cross-promotions can go a long way in constructing your target market.
Step 7: Track Your Progress and Improve
Once your podcast is up and running, it is important to keep an eye on how it is doing. With Spotify for Creators, you could access records on how many audience members are listening, where they are positioned, and which episodes are the most popular. These records can help you recognize what works and what does not, so that you can make improvements.
Ask your listeners for remarks, too. Encouraging evaluations or taking note of their recommendations can help you make your podcast better over the years. The greater your interaction with your target market, the more potent your podcast network becomes.
Final Thoughts
Starting a podcast on Spotify is a fun and interesting way to share your thoughts and connect with people around the world. With the right planning, system, and promotion, your podcast can grow and thrive. Keep creating, stay constant, and most importantly, have fun with the technique. Whether you are doing it as a hobby or as a serious project, your unique voice can locate an audience on Spotify.

Artificial Intelligence is not just for tech specialists anymore. It is a powerful tool for anyone looking to create art. Whether you are a pro artist or a complete novice, AI will let you bring your creative thoughts to life. In this blog, we will explore how to use AI to create art, step by step, using some of the most user-friendly tools available these days.
What Is AI Art?
AI art applies artificial intelligence to generate pictures, illustrations, or designs primarily based on text inputs or existing visuals. These AI models are trained on large datasets of photos and may produce particular works of art in diverse styles, from realistic portraits to summary compositions.
Top AI Art Tools to Get Started
Here are some beginner-friendly AI artwork platforms you may attempt:
1. Canva’s AI Art Generator
Canva has included AI into its platform, allowing users to create artwork from textual content prompts. Simply enter an outline, pick out an art style, and allow Canva to generate the photo for you. It is a fantastic starting point for those new to the AI artwork creation.
Step 1: Sign up for a free account at Canva.com.
Step 2: On the homepage, look for “AI Art Generator.”
Step 3: Enter a description of what you need (e.g., “a peaceful beach at sundown”).
Step 4: Choose the fashion (virtual, watercolor, etc.) and allow Canva to generate your artwork.
Step 5: Once the photograph is ready, you could tweak it by adjusting colorations, adding factors, or using different Canva capabilities to beautify it.
Canva is a perfect choice for novices who want fast results without a steep learning curve.
2. DALL·E 3 by Way of OpenAI
DALL·E 3 is a powerful AI version that generates remarkable photos from text descriptions. It is known for its capability to understand nuanced prompts and convey distinct artistic endeavors. Access to DALL·E 3 is available through platforms like ChatGPT and Microsoft’s Bing Image Creator.
Step 1: Go to Bing Image Creator or sign up for ChatGPT Plus.
Step 2: In the activate box, type out what you need to create. Be precise: for instance, “a futuristic city at night with neon lighting.”
Step 3: DALL·E 3 will generate some alternatives based on your description. You can pick the one you like or click on “Generate More” for versions.
Step 4: After deciding on your favourite photo, you may also refine it via typing in edits or producing new versions.
DALL·E 3 is wonderful for precise and creative creations, and it is especially great at managing complex, multi-element prompts.
3. Midjourney
Midjourney is an AI artwork generator that operates through a communication platform named Discord. By typing precise instructions, customers can generate images in diverse patterns. It is especially popular for its inventive and surreal outputs.
Step 1: Create a Discord account on (discord.com) if you have not already got one.
Step 2: Join the Midjourney Discord server by visiting their official website and clicking the “Join the Beta” button.
Step 3: On the server, discover one of the detailed channels for generating pictures (commonly categorised #novices).
Step 4: Type your textual content within the chat. For instance, “a woodland in watercolor portray.”
Step 5: The AI will respond with pics primarily based on your prompt. You can pick out the only one you like or ask for greater versions.
Midjourney is awesome for developing precise, creative pieces that have a dreamlike or abstract quality.
4. Stable Diffusion
Stable Diffusion is an open-source AI model that allows users to generate pictures from text prompts. It is versatile and may be run on private computers, making it available for people who desire more control over their creations.
Step 1: Download Stable Diffusion from its official site or use a third-party platform that hosts it, like DreamStudio (dreamstudio.ai).
Step 2: Sign up for an account (if required) and get access to the tool.
Step 3: Enter a command (e.g., “a cat flying in space”) and select the desired style and settings.
Step 4: The AI will generate an image primarily based on your input. You can alter settings like photograph decisions and seed values to tweak the effects.
Stable Diffusion is a high-quality alternative for progressive users who need more control over their creations.
How to Create Art with AI: A Step-by-Step Guide.
Step 1: Choose Your AI Art Tool
Select one of the AI artwork platforms referred to above. For beginners, Canva’s AI Art Generator is a great place to begin due to its easy approach.
Step 2: Design Your Prompt
Think about what you need to create. Be specific in your description to get high-quality effects. For instance, instead of pronouncing “a cat,” try “a fluffy orange cat sitting in a sunlit lawn.”
Step 3: Select an Art Style
Many AI tools offer numerous art styles, such as watercolor, oil painting, or virtual examples. Choose one that fits the vision you have for your artwork.
Step 4: Generate the Image
Enter your prompt and choose the preferred style. The AI will design your input and generate a photograph primarily based on your description.
Step 5: Refine and Edit
Most tools let you make modifications to the generated photo. You can tweak colours, upload factors, or exchange the composition to better suit your wishes.
Tips for Creating Stunning AI Art
Be Descriptive: The more significant details you offer for your design, the more accurate the AI’s output can be.
Experiment with Styles: Try one-of-a-kind artwork styles to see which one best conveys your concept.
Use References: Upload reference images to the manual for the AI to generate artwork that aligns with your vision.
Iterate: Do not be afraid to generate a couple of versions of the identical prompt to explore exceptional interpretations.
Ethical Considerations in AI Art
As AI-generated artwork will become increasingly conventional, it is critical not to forget ethical components:
Copyright Issues: Make sure that the AI tool you are using would not infringe on present copyrights. Some platforms, like Adobe Firefly, use licensed datasets to avoid such troubles .
Originality: While AI can generate superb artistic endeavors, it is crucial to feature your personal touch to make the art actually precise.
Usage Rights: Be aware of the phrases and conditions of the AI platform concerning the usage of generated snapshots, mainly if you plan to use them commercially.
Conclusion
Using AI to create art is an interesting way to discover your creativity. With tools like Canva, DALL·E 3, Midjourney, and Stable Diffusion, you may bring your inventive thoughts to existence without the need for superior technical capabilities. Remember to experiment, have fun, and always determine the ethical implications of your creations. Happy developing!